A before and after image slider lets you compare two images side by side. This is great for demonstrating the results of your products and services, or simply making your content more engaging.
In this article, you’ll learn how to create a before/after photo on your WordPress website without plugins.

Before/after image slider in WordPress
1. Add The Following Code to the functions.php File
In the WordPress dashboard, go to Appearance ➡ Theme File Editor and copy the following code into the child theme’s functions.php file and update it.
You must create a child theme before making any changes to functions.php file. Otherwise, the applied changes will be lost after each update.
Create child theme in WordPress step by step [without plugin]
As an alternative method, you can use the Code Snippets plugin to insert your codes into WordPress.
/**
* before/after image slider in WordPress by WPCookie
* https://redpishi.com/wordpress-tutorials/before-after-image-slider/
*/
add_filter( 'wp_footer', function ( ) {  ?>
<style>
.wpcookie-main-container-before-after *,
.wpcookie-main-container-before-after *::after,
.wpcookie-main-container-before-after *::before {
  margin: 0;
  padding: 0;
  box-sizing: border-box;
}
.wpcookie-main-container-before-after img {
  display: block;
  max-width: 100%;
}
.wpcookie-main-container-before-after {
  display: grid;
  place-items: center;
}
.wpcookie-image-container-before-after {
  display: grid;
  place-content: center;
  position: relative;
  overflow: hidden;
  border-radius: 1rem;
  max-width: 100%;
  max-height: 100%;
  --position: 50%;
}
.wpcookie-slider-image-before-after {
  width: 100%;
  height: 100%;
  object-fit: cover;
  object-position: left;
}
.wpcookie-image-before {
  position: absolute;
  inset: 0;
  width: var(--position);
}
.wpcookie-slider {
  position: absolute;
  inset: 0;
  cursor: pointer;
  opacity: 0;
  /* for Firefox */
  width: 100%;
  height: 100%;
}
.wpcookie-slider:focus-visible ~ .slider-button {
  outline: 5px solid black;
  outline-offset: 3px;
}
.slider-line {
  position: absolute;
  inset: 0;
  width: .2rem;
  height: 100%;
  background-color: #fff;
  z-index: 10;
  left: var(--position);
  transform: translateX(-50%);
  pointer-events: none;
}
.slider-button {
  position: absolute;
  background-color: #fff;
  color: black;
  padding: .5rem;
  border-radius: 100vw;
  display: grid;
  place-items: center;
  top: 50%;
  left: var(--position);
  transform: translate(-50%, -50%);
  pointer-events: none;
  z-index: 100;
  box-shadow: 1px 1px 1px hsl(0, 50%, 2%, .5);
}
</style>
<script>
let numBASlider = 0;
let numBASlidertow = 0;
let wpcookieBASimages = [];
let wpcookieBASimagesAlt = [];
document.querySelectorAll(".before-after")?.forEach(e => { e.querySelectorAll("img").forEach(image => { wpcookieBASimages.push(image.src);
 if (image.alt) { wpcookieBASimagesAlt.push(image.alt); } else { wpcookieBASimagesAlt.push("image"); }
})})
document.querySelectorAll(".before-after").forEach( e => {
  const main = `<div class="wpcookie-main-container-before-after">
   <div class="wpcookie-image-container-before-after" id="wpcookie-wpcookie-image-container-before-after${numBASlider}">
     <img decoding="async" loading="lazy"
       class="wpcookie-image-before wpcookie-slider-image-before-after"
      src="${wpcookieBASimages[numBASlidertow]}"
       alt="${wpcookieBASimagesAlt[numBASlidertow]}"
     />
     <img decoding="async" loading="lazy"
       class="wpcookie-image-after wpcookie-slider-image-before-after"
       src="${wpcookieBASimages[numBASlidertow+1]}"
       alt="${wpcookieBASimagesAlt[numBASlidertow+1]}"
     />
 <input type="range" min="0" max="100" value="50" aria-label="Percentage of before photo shown" class="wpcookie-slider" id="wpcookie-slider${numBASlider}" /><div class="slider-line" aria-hidden="true"></div><div class="slider-button" aria-hidden="true"> <svg xmlns="http://www.w3.org/2000/svg" width="30" height="30" fill="currentColor" viewBox="0 0 256 256" > <rect width="256" height="256" fill="none"></rect> <line x1="128" y1="40" x2="128" y2="216" fill="none" stroke="currentColor" stroke-linecap="round" stroke-linejoin="round" stroke-width="16" ></line> <line x1="96" y1="128" x2="16" y2="128" fill="none" stroke="currentColor" stroke-linecap="round" stroke-linejoin="round" stroke-width="16" ></line> <polyline points="48 160 16 128 48 96" fill="none" stroke="currentColor" stroke-linecap="round" stroke-linejoin="round" stroke-width="16" ></polyline> <line x1="160" y1="128" x2="240" y2="128" fill="none" stroke="currentColor" stroke-linecap="round" stroke-linejoin="round" stroke-width="16" ></line> <polyline points="208 96 240 128 208 160" fill="none" stroke="currentColor" stroke-linecap="round" stroke-linejoin="round" stroke-width="16" ></polyline> </svg> </div>
   </div>
</div>`
e.insertAdjacentHTML("afterend",main  );
e.remove();
const container = document.querySelector(`#wpcookie-wpcookie-image-container-before-after${numBASlider}`);
document.querySelector(`#wpcookie-slider${numBASlider}`).addEventListener("input", (e) => {
  container.style.setProperty("--position", `${e.target.value}%`);
})
numBASlider++;
numBASlidertow = numBASlidertow + 2;
} )
</script>
<?php });
2. Add a Gallery block
Add a Gallery block to the page and add two images to it. It would be great if they have the same size.
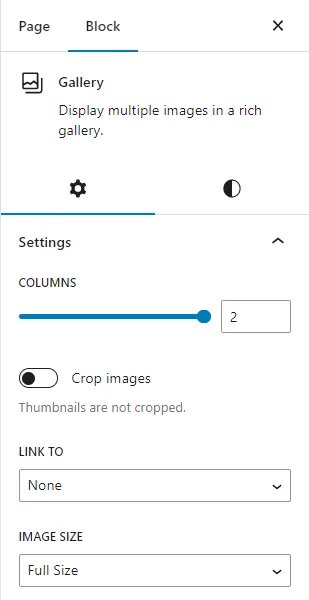
Then we can configure this block by setting COLUMNS to 2 and IMAGE SIZE to Full Size. Don’t forget to turn off the Crop images option.
Finally, we can assign the ‘before-after’ class to this block.
Great! If you check the page now, you’ll see that the gallery block has been converted into a before/after slider.
If this article is difficult for you to read in text, you can watch the video version below.
