On the product page of online stores, depending on the product you sell, you will need custom tabs to display the product specifications.
For example, for clothing stores, you may want to display clothing sizing charts or recurring questions and answers in a new tab for faster customer access.
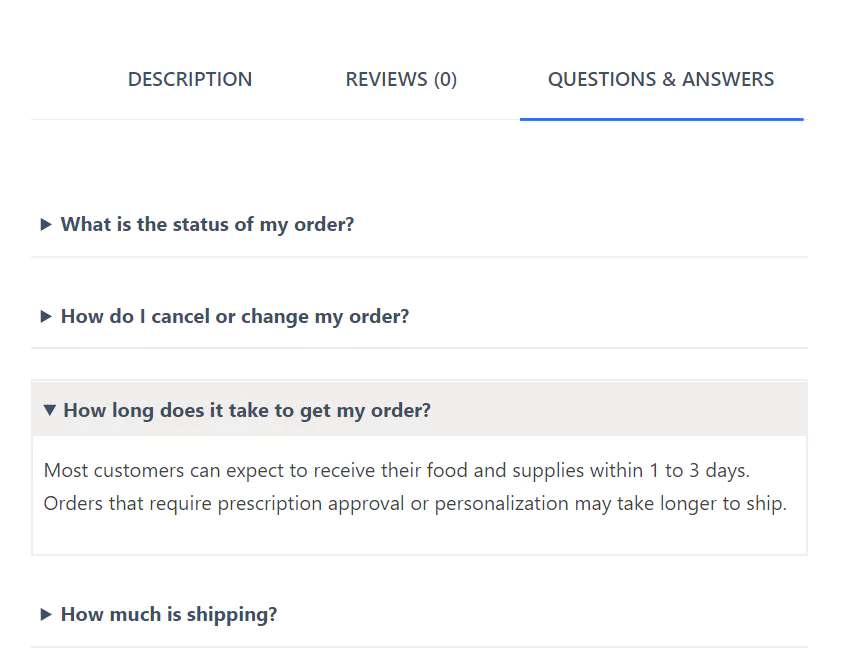
Table of Contents
In this tutorial, we teach you how to make a custom tab for the Woocommerce product page without plugins.
Add custom tab in Woocommerce product page
Inside the WordPress dashboard Theme Editor or on the web server, find and open the functions.php file. Go to Appearance -> Theme Editor.
You must create a child theme before making any changes to functions.php file. Otherwise, the applied changes will be lost after each update.
Create child theme in WordPress step by step [without plugin]
As an alternative method, you can use the Code Snippets plugin to insert your codes into WordPress.
Copy the PHP code from the below box and paste it at the end of the functions.php file.
add_filter( 'woocommerce_product_tabs', 'product_tab' );
function product_tab( $tabs ) {
	$tabs_title = "New Tab";

	$tabs['FAQ'] = array(
		'title' 	=> __( $tabs_title, 'woocommerce' ),
		'priority' 	=> 20,
		'callback' 	=>
'product_tab_content'
	);
	return $tabs;
}
function product_tab_content() { ?>

<!-- Write the tab content here -->

<?php }
Write the title of the new tab in this part of the code:
$tabs_title = "New Tab";Write the content of the tab in this section, you can also use HTML codes to write the content.
function product_tab_content() { ?>

<!-- Write the tab content here -->

<?php }
After updating the functions.php file, the new tab will be displayed in all products.
If you want the new tab to be displayed only in certain products, you should use Conditional Tags.
In the following article, how to use Conditional Tags is fully explained.
How to add PHP code in WordPress [without plugins]
Add Question & Answer tab in product page
Step 1.Add The Following Code to the functions.php File
Inside the WordPress dashboard Theme Editor or on the web server, find and open the functions.php file. Go to Appearance -> Theme Editor.
You must create a child theme before making any changes to functions.php file. Otherwise, the applied changes will be lost after each update.
Create child theme in WordPress step by step [without plugin]
As an alternative method, you can use the Code Snippets plugin to insert your codes into WordPress.
Copy the PHP code from the below box and paste it at the end of the functions.php file.
add_filter( 'woocommerce_product_tabs', 'Questions_Answers' );
function Questions_Answers( $tabs ) {
	$tabs_title = "Questions & Answers";

	$tabs['Questions_Answers'] = array(
		'title' 	=> __( $tabs_title, 'woocommerce' ),
		'priority' 	=> 20,
		'callback' 	=>
'Questions_Answers_tab_content'
	);
	return $tabs;
}
function Questions_Answers_tab_content() {
$QA_raw = (get_post_meta(get_the_ID(), 'qa', false));
if ($QA_raw){
foreach ($QA_raw as $key => $value) {	?>
	<details>
	  <summary><?= explode("\n",$value)[0]; ?></summary>
	 <?php echo join(" ",array_slice(explode("\n",$value),1));	 ?>
	</details>
<?php } } ?>
<style>
:root {
  --details-main: #ebeae9;
}

details p {
    color: #414141;
}

details {
  margin: 1.3rem 0;
  border-bottom: 2px solid var(--details-main)  ;
  padding: 0.3rem 0.5rem 0.3rem 0.5rem;
  transition: max-height 1s ease;
  overflow: hidden;
}

details[open] {
  max-height: 50rem;
  border: 2px solid var(--details-main)  ;

}

details summary {
  font-weight: bold;
  cursor: pointer;
  margin-bottom: 0.5em;
  font-weight: bold;
  margin: -0.3em -0.5em 0;
  padding: 0.5em;
}

details[open] summary {
  border-bottom: 1px solid var(--details-main)  ;
  margin-bottom: 0.8em;
  background-color: var(--details-main)  ;
}

details:not([open])
{max-height: 5rem;}
</style>

<details>
  <summary>Question 1</summary>
  Answer 1
</details>

<details>
  <summary>Question 2</summary>
  Answer 2
</details>

<?php
  }
Step 2.Customize the new tab builder code
Write the title of the new tab in this part of the code:
$tabs_title = "Questions & Answers";Copy the <details> tag as many times as you need and write your questions and answers in it.
<details>
  <summary>Question 1</summary>
  Answer 1
</details>

<details>
  <summary>Question 2</summary>
  Answer 2
</details>

<details>
  <summary>Question 3</summary>
  Answer 3
</details>
These questions and answers are displayed in all products. If you need a separate question and answer tab for each product, follow the next step.
Step 3.Questions & answers for each product by Custom Fields
Step 3.1.Turn On the Custom Fields Option
Go to WordPress dashboard, then open an existing product page.
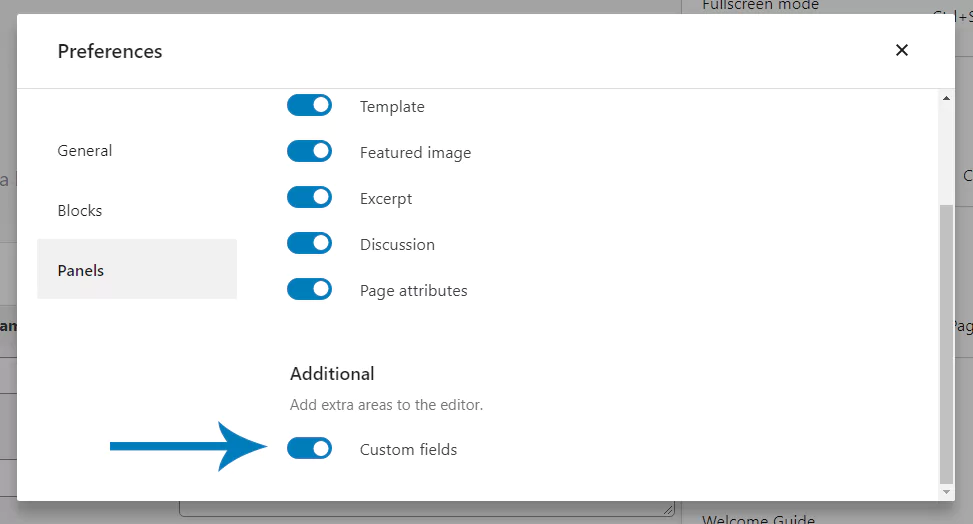
At the top right of your WordPress dashboard, you should see three dots. Click on those dots to open the WordPress options menu.
In the pop-up screen for Preferences, click on the “Panel” tab located on the left-hand side.
Under the “Additional” section, click on the “Custom Fields” toggle bar to toggle it to the on position. A page reload is required for this change. Make sure your content is saved before reloading. Then, click on the “Enable and Reload” button that appears.
After the page reloads, a “Custom Fields” section will appear below your WordPress text editor.
Step 3.2.Create Custom Fields for each Question & answer
Scroll down past the bottom of the WordPress text editor to the new “Custom Fields” section that was enabled in the previous step.
You should now see an “Add New Custom Field” area.
Here’s how you create the custom field for meta keywords:
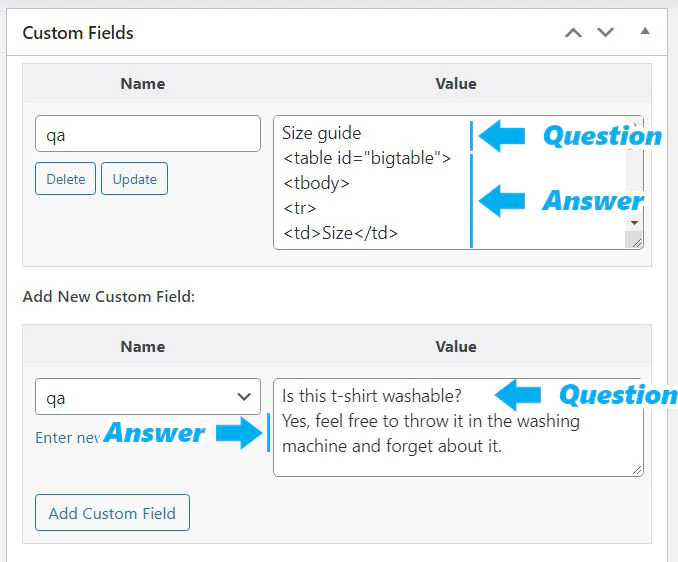
- Under the “Name” column, click on “Enter New” which is located below the “- Select -” dropdown menu.
- In the text field that now appears under the “Name” column, type in “qa”. This will assign a custom field for the meta keywords.
- In the text field under the “Value” column, Write the title of the question in the first line, then go to the next line by pressing the enter key and write the answer. You can use plain text, tables or images in the answer section.
- Click on the “Add Custom Field” button to save this new custom field for the meta keywords.
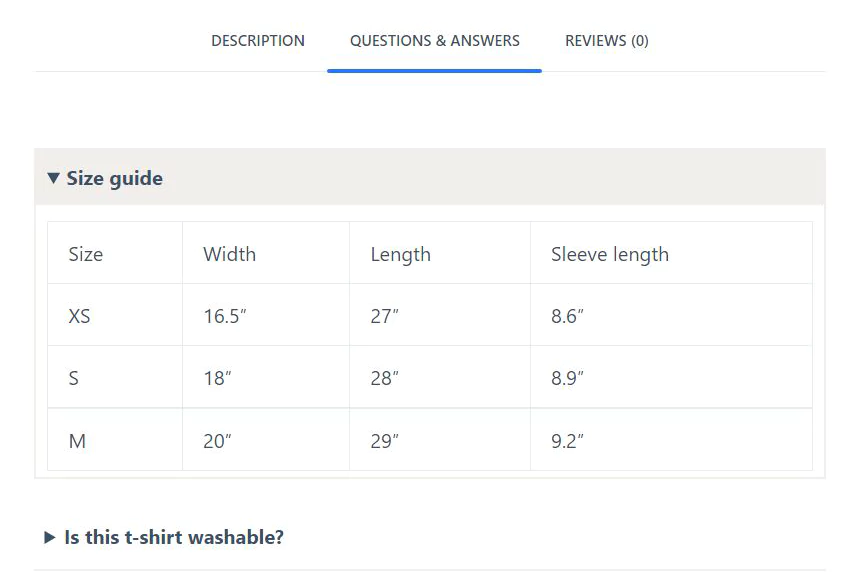
Step 3.3.Update the product and check the result
After updating the custom fields, you will see the entered question and answer in the new tab. Here we have entered the T-shirt size guide table in the question and answer tab.
If this article is difficult for you to read in text, you can watch the video version below.
That’s it, If you have a question, be sure to comment for us to answer.

Thank you for this post, it has definitely saved me more money. Just one question, I only want to add this custom tab to one category. We sell ingredients for scented products made by hand, and we need the extra tab in our fragrances for the tech documents. Thank you for your time!
Hello Maya,
thank you for this article, this helps a lot and the most important – it works like a charm. I got one question regarding your code.
I want to show a tab only then, when multiple custom fields (advanced custom fields) of a product in woocommerce have content. The custom fields shall be inside the tab. Like this:
– Tab with content inside custom fields –
Custom Field 1: Lorem Ipsum
Custom Field 2: Lorem Ipsum
Custom Field 3: Lorem Ipsum
Otherwise the tab shall not be displayed, when the custom fields are empty. If only one field has content, then only one field shall be displayed. Of only two fields have content, then only two shall be displayed and so on.
Do you know, how i can do that?
Thank you and have a nice day
Patrick
Hello Patrick.
Try this code:
https://pastecode.io/s/y5yiam6k
function show_custom_fields_in_new_tab() {
// Get the current product object
$product = wc_get_product(get_the_id());
// Check if the custom fields are empty
if (empty($product->get_meta(\’custom_field_1\’)) && empty($product->get_meta(\’custom_field_2\’)) && empty($product->get_meta(\’custom_field_3\’))) {
return;
}
// Create a new tab
$tabs = array(
\’custom_fields\’ => array(
\’title\’ => __( \’Custom Fields\’, \’your-text-domain\’ ),
\’callback\’ => \’display_custom_fields\’,
),
);
// Add the tab to the product page
woocommerce_add_tabs( $tabs );
// Function to display the custom fields
function display_custom_fields() {
echo \’Custom Fields\’;
echo \’\’;
echo \’Custom Field 1: \’ . $product->get_meta(\’custom_field_1\’) . \’\’;
echo \’Custom Field 2: \’ . $product->get_meta(\’custom_field_2\’) . \’\’;
echo \’Custom Field 3: \’ . $product->get_meta(\’custom_field_3\’) . \’\’;
echo \’\’;
}
}
add_action( \’woocommerce_after_single_product\’, \’show_custom_fields_in_new_tab\’ );
Replace the \”custom_field_1\” 2 and 3 with your desire names.