Email not being sent is a common problem in newly established WordPress sites. The reason for this problem is disabling the PHP mail function on your web host. To solve this problem, you need to configure SMTP settings on your WordPress site.
There are various plugins to do SMTP settings in WordPress, in this article we will teach you how to do SMTP settings without a plugin.
Configure SMTP email on WordPress Without Plugin
Step 1.Create an email account
1.1.login to Cpanel
You can usually enter cPanel by adding port 2083 at the end of your domain URL, this address may be different for your host.
yoursite.com:2083
1.2.Go to Email Accounts

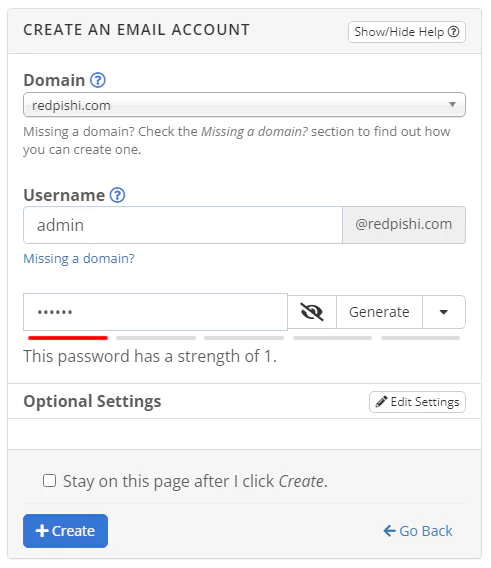
1.3.Create a new email account in cpanel
Click the Create button and create an email like the image below. I created an email with admin username and assigned a password to it.
Step 2.Find SMTP settings in your host
You can get these settings directly from your hosting support. Otherwise, follow these steps:
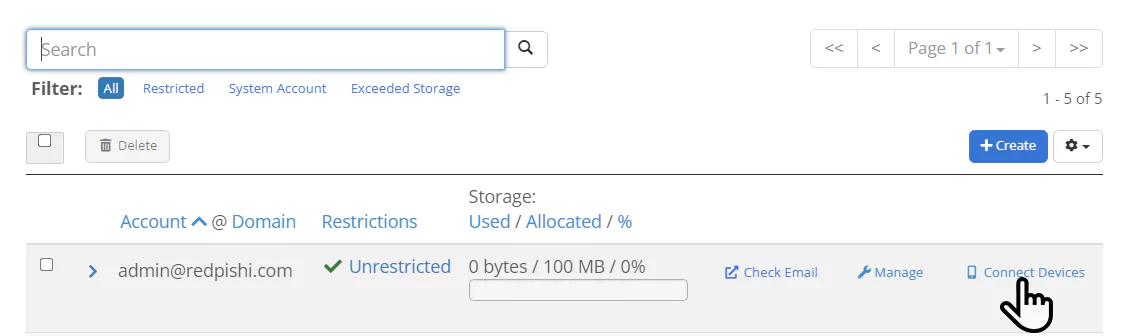
2.1.Click the Connect Devices button
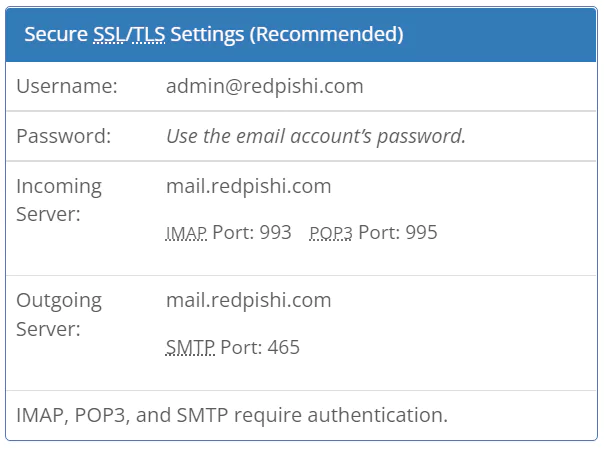
2.2.Save the SMTP settings
On this page you can find SMTP settings.
Step 3.Add The Following Code to the functions.php File
Inside the WordPress dashboard Theme Editor or on the web server, find and open the functions.php file. Go to Appearance -> Theme Editor.
You must create a child theme before making any changes to functions.php file. Otherwise, the applied changes will be lost after each update.
Create child theme in WordPress step by step [without plugin]
As an alternative method, you can use the Code Snippets plugin to insert your codes into WordPress.
Copy the PHP code from the below box and paste it at the end of the functions.php file.
add_action( 'phpmailer_init', function ( $phpmailer ) {
//*****************settings*********************//
$Outgoing_Server = 'mail.yoursite.com';
$Port = '25';
$email = 'admin@yoursite.com';
$password = '123456';
$site_name = 'Redpishi';
//*****************settings*********************//
$phpmailer->isSMTP();
$phpmailer->Host       = $Outgoing_Server;
$phpmailer->Port       = $Port;
$phpmailer->SMTPSecure = '';
$phpmailer->SMTPAuth   = true;
$phpmailer->Username   = $email;
$phpmailer->Password   = $password;
$phpmailer->From       = $email;
$phpmailer->FromName   = $site_name;
$phpmailer->addReplyTo($email, $site_name);
$phpmailer->SMTPOptions = array(
    'ssl' => array(
        'verify_peer' => false,
        'verify_peer_name' => false,
        'allow_self_signed' => true
    ));
} );

add_action('wp_mail_failed', function ( $wp_error ){
	$timee = date("Y-m-d");
	$emaill = array(
	"email_to" => $args["to"],
	"email_subject" => $args["subject"],
	"email_message" => $args["message"]
	);
    $fn = ABSPATH . '/mail.log'; // say you've got a mail.log file in your server root
    $fp = fopen($fn, 'a');
	fputs($fp, "Mailer Error: " . serialize($wp_error).  " email: " . $emaill[1] . "  time -> " . $timee . "\n");
    fclose($fp);
}, 10, 1);
Step 4.Configure SMTP code
You can find the outgoing server in step 2.2.
$Outgoing_Server = 'mail.yoursite.com';Don’t change the port unless you what you are doing.
$Port = '25';Enter the email and password you created in step 1 here.
$email = 'admin@yoursite.com';
$password = '123456';
Write your site name here.
$site_name = 'Redpishi';Step 4.Check the email sent.
Save the functions.php file and submit a contact form to make sure that the email is sent correctly.
How to make a contact form with us:
Add Contact Form in WordPress without plugins [free]
If this article is difficult for you to read in text, you can watch the video version below.

I want to learn woocommerce