The most sensitive part of WordPress CMS is the login page, and this is the first place that hackers attack it.
Hackers usually try a large number of passwords on your site’s login page with a special script to get your password, this method is called Brute force attack.

Unfortunately, WordPress does not prevent these kind of attacks by default, and we as webmasters have to secure our login page ourselves.
There are two ways to prevent a brute force attack, one: Using the captcha on the login page, two: Limiting login attempts and blocking suspicious activities.
In this article, we will learn how to limit login attempts and block suspicious activities in WordPress without plugins.
How to Limit Login Attempts in WordPress
1. Copy the following code into your functions.php
In the WordPress dashboard, go to Appearance ➡ Theme File Editor and copy the following code into the theme’s functions.php file and update it.
You must create a child theme before making any changes to functions.php file. Otherwise, the applied changes will be lost after each update.
Create child theme in WordPress step by step [without plugin]
As an alternative method, you can use the Code Snippets plugin to insert your codes into WordPress.
// Limit login attempts by WPcookie
// https://redpishi.com/wordpress-tutorials/limit-login-attempts-wordpress-without-plugin/

function check_attempted_login( $user, $username, $password ) {
	$try_limit = 4;
    if ( get_transient( 'attempted_login_'.$username ) ) {
        $datas = get_transient( 'attempted_login_'.$username );

        if ( $datas['tried'] >= $try_limit ) {
            $until = get_option( '_transient_timeout_' . 'attempted_login_'.$username );
            $time = time_to_go( $until );

            return new WP_Error( 'too_many_tried',  sprintf( __( '<strong>ERROR</strong>: You have reached authentication limit, you will be able to try again in %1$s.' ) , $time ) );
        }
    }

    return $user;
}
add_filter( 'authenticate', 'check_attempted_login', 30, 3 );


function login_failed( $username ) {
	$ban_duration = 1;  // hour(s)

    if ( get_transient( 'attempted_login_'.$username ) ) {
        $datas = get_transient( 'attempted_login_'.$username );
        $datas['tried']++;

        if ( $datas['tried'] <= 3 )
            set_transient( 'attempted_login_'.$username, $datas , $ban_duration * 3600 );
    } else {
        $datas = array(
            'tried'     => 1
        );
        set_transient( 'attempted_login_'.$username, $datas , $ban_duration * 3600 );
    }
}
add_action( 'wp_login_failed', 'login_failed', 10, 1 );

function time_to_go($timestamp)
{

    // converting the mysql timestamp to php time
    $periods = array(
        "second",
        "minute",
        "hour",
        "day",
        "week",
        "month",
        "year"
    );
    $lengths = array(
        "60",
        "60",
        "24",
        "7",
        "4.35",
        "12"
    );
    $current_timestamp = time();
    $difference = abs($current_timestamp - $timestamp);
    for ($i = 0; $difference >= $lengths[$i] && $i < count($lengths) - 1; $i ++) {
        $difference /= $lengths[$i];
    }
    $difference = round($difference);
    if (isset($difference)) {
        if ($difference != 1)
            $periods[$i] .= "s";
            $output = "$difference $periods[$i]";
            return $output;
    }
}
Code credit: The above code is an extended version of the PHPPOT code.
2. Customize the code (optional)
There is 2 variables that you should check:
$try_limit: Block user after entering how many wrong passwords? We recommend that you set this number between 3 and 5.
$ban_duration: How long the user will be blocked (in hours)
After changing those two variables as your liking Update functions.php file and check the result.

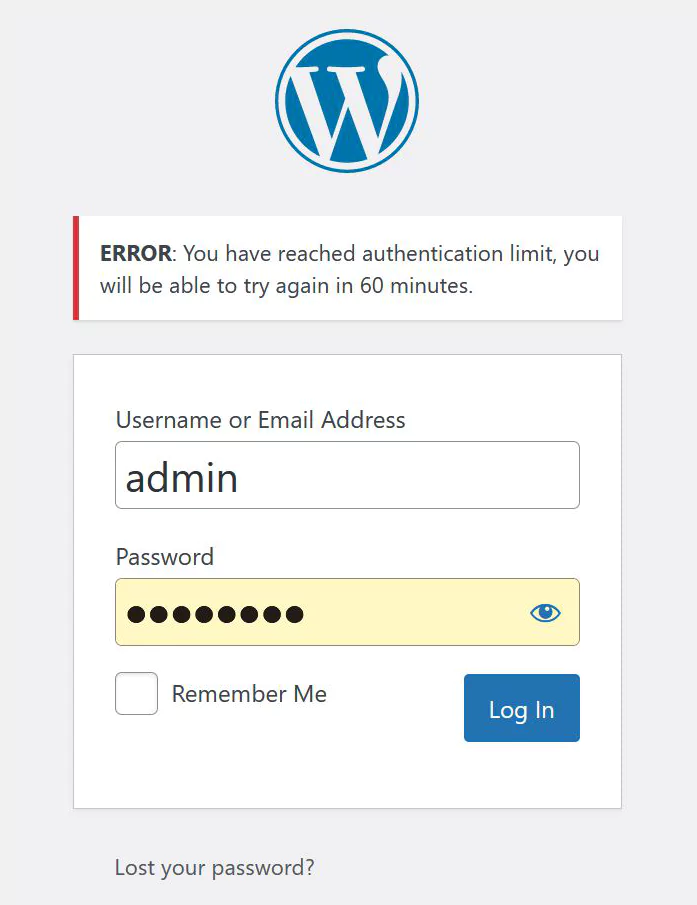
That’s it, As you can see, the user is blocked for one hour after entering 4 wrong passwords.
now let’s check .
Code explanation
This code consists of three functions:
login_failed: After entering each incorrect password, it creates a transient called attempted_login and writes the number of times the wrong password was entered and the block duration.
check_attempted_login: This function checks the transient file created by the above function and blocks the user for a specified period of time if the $try_limit variable is more than allowed.
time_to_go: This function makes the block time readable for the user.
If this article is difficult for you to read in text, you can watch the video version below.
Another way to prevent brute force attacks on the WordPress login page is to use Google recaptcha. In the following post, you will learn how to add Google recaptcha to the WordPress login page.
What is the difference between limiting login attempts and using two-factor authentication (2FA) to secure my WordPress website?
Limiting login attempts and using two-factor authentication (2FA) are both security measures to protect your WordPress website, but they work in different ways. Limiting login attempts restricts the number of times a user can try to log in before being temporarily locked out, which helps prevent brute force attacks. On the other hand, 2FA adds an extra layer of security by requiring users to provide an additional verification code (usually sent to their mobile device or email) along with their username and password. While both methods enhance your website’s security, using a combination of limiting login attempts and 2FA provides even greater protection against unauthorized access.
Can I still access my WordPress website if I accidentally lock myself out due to too many failed login attempts?
Yes, you can still access your WordPress website if you accidentally lock yourself out. If you have access to your website’s hosting control panel or FTP, you can manually remove the lockout by deleting the corresponding entry in the functions.php file.
Hi!
I attempted to use this code together with your script for recaptcha login, but it dosn\’t seems to be working together, because it never stopped me from trying to login several times. Is there some incompatibility between them?
Hi Jonas,
I haven\’t tested these two codes together, so I can\’t confidently give you an answer. However, since both codes use the WordPress hook \”authenticate\” there is a possibility of conflict.
To resolve this conflict, you can combine the two codes and call the \”authenticate\” hook only once instead of calling it twice.
I\’m little to stupid to solve that by my self, it\’s pity that
Custom login page with reCAPTCHA in WordPress without plugin & Limit login attempts in WordPress without plugin don\’t work together, because I really wanted to use those two combined with step 2 in change-admin-url-without-plugins. That would have made the ultimate login page, bot-secure, bruteforce and redirecting all pesky attempts to wp-admin login to a custom page..
How can i use in custom login page?