Tabs are commonly used to allow the user to navigate to different sections of the site.
WordPress does not have a special block for creating tabs, but there is no need to worry because in this article we will teach you how to create tabs in WordPress without installing any plugins.
Add tabs in WordPress without plugins
We use the Button block to create tab titles and the Gutenberg block group for the content of each tab.

In the content section of each tab, you can put anything you want, from a simple paragraph to the latest posts or products.
Step1. Add buttons Block
Add a buttons Block and assign the “red-tab” class to it.
Now add as many tabs as you have to that button. Assign “tab-title” class to each button.
Write a name for the button, the name of the buttons will be the same as the title of your tabs.

Step2. Add tabs content
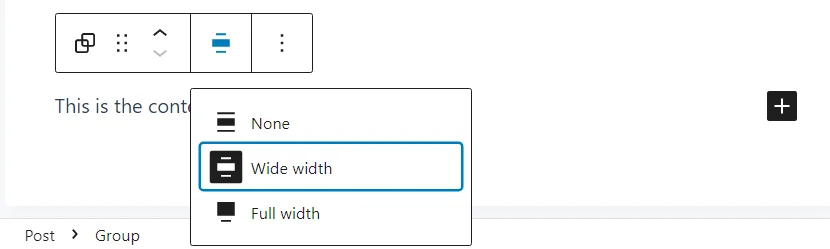
Create the content of the first tab using Gutenberg blocks and finally select and group all blocks and assign the “tab-content” class to it.
Select the group and set its display type to “wide width”.
Do the above steps for the content of other tabs as well.
Step3. Add red tab script
Create a custom HTML block and put the following script in it.
<style>
:root {
  --tab-main: #bd06f3;
  --tab-gray: #ccc;
}

.red-tab {
    overflow: hidden;
    border-bottom: 1px solid var(--tab-gray);
    background-color: white;
    display: flex;
    flex-wrap: wrap;
    align-items: center;
    justify-content: flex-start!important;
    align-content: space-between;
    flex-direction: row;
    margin-bottom: 1px!important;
    gap: 0px!important;
}
.red-tab div{
  float: left;
  border-bottom: 3px solid transparent;
  cursor: pointer;
  transition: 0.3s;
  font-size: 17px;
}
.red-tab a.wp-block-button__link {
    color: black!important;
    background-color: transparent!important;
}
.red-tab div a {
    padding: 20px 40px!important;
}
.red-tab div:hover a, .red-tab div.active a {
    color: var(--tab-main)!important;
}
.red-tab div.active, .red-tab div:hover {
    color: var(--tab-main)!important;
    border-bottom: 3px solid var(--tab-main);
    z-index: 3;
}
.tab-content {
    display: none;
    padding: 35px 15px;
    border-top: none;
    box-shadow: 0 12px 25px -10px #00000040;
	background-color: white;
}
.active {
    display: block;
}
</style>


<script>
document.addEventListener("click", e => {  if (e.target.parentElement.classList.contains("tab-title")  ) { redTab(e) }  });

[...document.querySelectorAll("div.red-tab div")].forEach((tabTile, index) => {
    tabTile.classList.toggle('active', index == 0)
  });
[...document.querySelectorAll(".tab-content")].forEach((tabcontent, index) => {
  tabcontent.classList.toggle('active', index == 0)
  });
function redTab(e) {
  let tabTiles = [...document.querySelectorAll("div.red-tab div")];
  let tabcontents = [...document.querySelectorAll(".tab-content")];
  let activeTabIndex = tabTiles.findIndex(tab => { return tab == e.target.parentElement })
  tabTiles.forEach((tabTile, index) => {
    tabTile.classList.toggle('active', index === activeTabIndex)
  })
  tabcontents.forEach((tabcontent, index) => {
  tabcontent.classList.toggle('active', index === activeTabIndex)
  })
}
</script>
After adding the above script to the page, the generated tab will work properly.
In the script above, to change the color of the active tab, write your desired color code in the following parameter:
--tab-main: #bd06f3;Display posts in tabs
To display the desired posts in each tab, you can use the “Query Loop” block in the content section of each tab.
The advantage of using this block is that by adding new posts, the displayed posts will be dynamically updated.
Below is an example of a tab made with the same method:
![How to add preloader in WordPress [without plugins]](https://redpishi.com/wp-content/uploads/2022/06/preloader-in-wordpress-without-plugin.webp)
![How to add PHP code in WordPress [without plugins]](https://redpishi.com/wp-content/uploads/2022/06/how-to-add-php-code-in-wordpress.webp)
![Add Contact Form in WordPress without plugins [free]](https://redpishi.com/wp-content/uploads/2022/07/how-to-add-contact-form-in-wordpress-without-plugin.webp)
This tab is made using redpishi.com script.
Have fun!
If this article is difficult for you to read in text, you can watch the video version below.
