As you know, WordPress does not have the option to add a contact form by default, and to add a form, you must use third party plugins such as contact form 7.
The drawback of using these plugins is that they will load their files on all pages of your site (even if you have not used any form on your pages) and slow down your site.
In this article, you will learn how to create a contact form on your WordPress site without using any plugins. Our form is fully customizable and with honeypot technique can block spammers and bots that could attack your website forms.
How to add contact form in WordPress without plugin
Step 1. Add form processor to functions.php
In the WordPress dashboard, go to Appearance ➡ Theme File Editor and copy the following code into the theme’s functions.php file and update it.
You must create a child theme before making any changes to functions.php file. Otherwise, the applied changes will be lost after each update.
Create child theme in WordPress step by step [without plugin]
As an alternative method, you can use the Code Snippets plugin to insert your codes into WordPress.
// redpishi.com Contact Form

add_action('wp_ajax_submitmyform','submitmyform');
add_action('wp_ajax_nopriv_submitmyform','submitmyform');

function submitmyform(){
$tomyform = get_bloginfo('admin_email');

$system = array();
if ($_POST['website'] != '') {
	$system['statuse']='er';
	$system['reply']='Suspicious activity was detected, That’s all we know.';
	echo json_encode($system, JSON_UNESCAPED_UNICODE);
    exit; die(); }

foreach($_POST as $key => $value) {
    if (strpos($value, '"') !== FALSE) {
	$system['statuse']='er';
	$system['reply']='The character entered in the form is not acceptable, please contact the site support.';
	echo json_encode($system, JSON_UNESCAPED_UNICODE);
	exit; die(); }}

$siteURL = get_site_url();
$frommyform = 'info@'.substr($siteURL, strpos($siteURL, ".") + 1);
$headersmyform = "From: $frommyform\n";
$headersmyform .= "MIME-Version: 1.0\n";
$headersmyform .= "Content-type: text/html; charset=UTF-8\n";

function form1($tomyform , $headersmyform) {
	unset($_POST['formid'], $_POST['website'], $_POST['action']);
	$system = array();
	$post = array();

	foreach($_POST as $key => $value) {
		if(strpos($value, "\n") !== FALSE) {
			$post[] = $key.': <b>'.nl2br(filter_var($value,FILTER_SANITIZE_STRING)).'</b>';
		}
		else {
			if ((strpos($value, "@") !== FALSE)) {
				$post[] = $key.': <b>'.nl2br(filter_var($value,FILTER_SANITIZE_EMAIL)).'</b>';
			} else {$post[] = $key.': <b>'.filter_var($value,FILTER_SANITIZE_STRING).'</b>';}
		}}
	$Agent = $_SERVER['HTTP_USER_AGENT'];
	preg_match('!\(.*?\)!',$Agent , $userAgent);
	$message = join("<br />",$post);
	$message .= "<br><br>---------<br>";
	$message .= "UserAgent: ".str_replace(array("(", ")"), "", $userAgent[0])."<br>";
	$message .= "User IP: ".$_SERVER['REMOTE_ADDR']."<br>";
	$subject = 'Contact Form';

	if ( wp_mail( $tomyform, $subject, $message, $headersmyform )  )	{
				$system['statuse']='ok';
				$system['reply']='Thank you for getting in touch! <br>
We appreciate you contacting us. One of our colleagues will get back in touch with you soon!Have a great day!';
				echo json_encode($system, JSON_UNESCAPED_UNICODE);
				exit; die();

		} else { 	$system['statuse']='er';
					$system['reply']='Sorry, There is a problem in sending your form, please email us your message.';
					echo json_encode($system, JSON_UNESCAPED_UNICODE);
					exit; die();
    				 }}

if ($_POST['formid']) {

	$id = $_POST['formid'];
	if ($id == '1001'){ form1($tomyform , $headersmyform ); }
	else if ($id == '1002'){ form2($tomyform , $headersmyform ); }
	else {
	$system['statuse']='er';
	$system['reply']='The form is not authorized, please contact the site support.';
	echo json_encode($system, JSON_UNESCAPED_UNICODE);
	exit; die(); }}}
Customize form processor (optional)
The above code will work correctly by default, but if you want to customize it a bit, do the following:
Submitted forms are sent to the site admin’s email, if you want to change the recipient’s email, you must edit this part of the code:
Change $tomyform = get_bloginfo(‘admin_email’); to $tomyform = ‘youremail@gmail.com’;
To change the success or failure message, replace the highlighted parts of the above code with your own message.
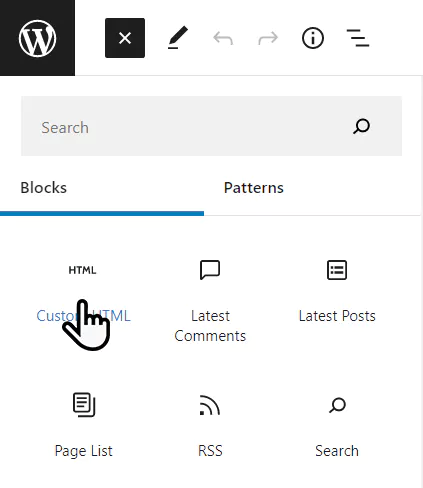
Step 2. Insert HTML and JavaScript portion of contact form to your page
Edit your contact me page and add an HTML block and copy all the following code in it and publish the page.
<form id="contactForm" onsubmit="submitCform(); return false;">
<label for="name">Name:</label>
<input type="text" id="name" name="name" placeholder="Your Name" required>
<label id="website" for="website">website:</label>
<input type="text" id="website" name="website" autocomplete="off" placeholder="www.yoursite.com">
<label for="email">Email:</label>
<input type="email" id="email" name="email" placeholder="Yourid@gmail.com" required>
<label for="subject">Subject:</label>
<input type="text" id="subject" name="subject" placeholder="The title of your message" required>
<label for="message">Message:</label>
<textarea rows="3" id="message" name="message" placeholder="Type your message here" required>
</textarea>
<input id="mybtn" type="submit" value="SEND MESSAGE">
<span id="status"> </span>
<input type="hidden" id="formid" name="formid" value="1001">
</form>
<script>
const contactForm = document.querySelector("form#contactForm");
function submitCform() {
document.querySelector("form#contactForm #mybtn").disabled = "true"
document.querySelector("form#contactForm #mybtn").value = 'Please wait...'
var formdata = new FormData(contactForm);
formdata.append('action', 'submitmyform')
AjaxCform(formdata)
}
async function AjaxCform(formdata) {
const url = location.protocol+ '//'+ window.location.hostname +'/wp-admin/admin-ajax.php?action=submitmyform'
const response = await fetch(url, {
method: 'POST',
body: formdata,
});
const data = await response.json();
if (data['statuse'] == 'ok'){
document.querySelector("form#contactForm").innerHTML = `<div id="success">
${data['reply']}
</div>`
} else if (data['statuse'] == 'er') {
document.querySelector("form#contactForm span#status").innerHTML = `<div id="er">
Ops, ${data['reply']}
</div>`
document.querySelector("form#contactForm #mybtn").disabled = false
document.querySelector("form#contactForm #mybtn").value = 'Try again'
}}
</script>
<style>
#website {display: none;}
form#contactForm {
max-width: 95%;
width: 550px;
padding: 20px;
border-radius: 5px;
box-shadow: 0px 15px 29px -22px #afa9a9;
background-color: white;
}
#er {
color: #f21515;
background-color: #fff0f0;
font-weight: bold;
border: 3px solid #f21515;
border-radius: 5px;
padding: 10px 10px;
max-width: fit-content;
margin: 15px auto;
}
#success {
color: #23a238;
background-color: azure;
font-weight: bold;
border: 3px solid #23a238;
border-radius: 5px;
padding: 10px 10px;
max-width: fit-content;
margin: 15px auto;
}
label {
display: block;
padding-top: 15px;
margin-left: 10px;
}
#contactForm input::placeholder,#contactForm textarea::placeholder {
color: #b5b5b5;
}
#contactForm input[placeholder],#contactForm textarea[placeholder] {
font-size: 1rem;
line-height: 2rem;
}
form#contactForm input#mybtn {
margin-top: 15px;
display: block;
height: 3rem;
color: white;
background: #0088a7;
padding: 0px 23px;
border: none;
border-radius: 5px;
cursor: pointer;
}
form#contactForm input[type="text"], form#contactForm input[type="email"], form#contactForm textarea {
width: 100%;
border: 1px solid #f1f0f0;
border-radius: 5px;
padding: 3px 10px;
margin-top: 3px;
}
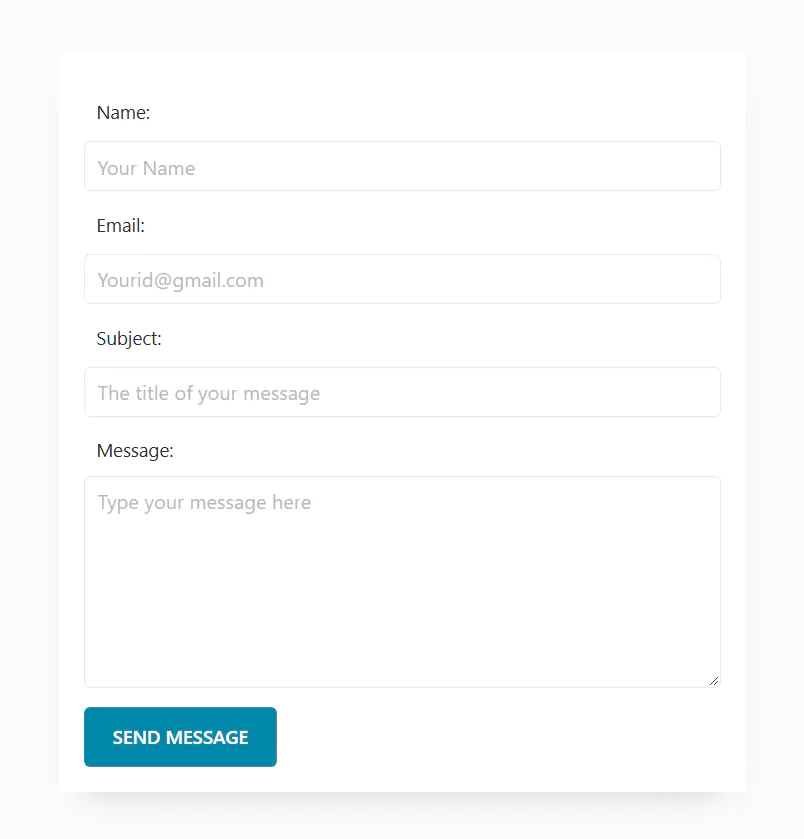
</style> Your contact form is ready to use. According to your theme, the appearance of this form may be slightly different, in the image below you can see the contact form in the Blocksy theme.
Customize form Html (optional)
Customize the appearance of the form
The CSS part of the above code is completely optional, if you don’t like the color and appearance of this form, you can delete all the code between <style></style> tags or put your own style.
Add or remove form fields
You can delete any of the form files if you want, for example, if you want to remove the subject field, just delete the following piece of code from the HTML code of the form.
<!--I'm just explaining above code and you should not copy this part into your site-->
<label for="subject">Subject:</label>
<input type="text" id="subject" name="subject" placeholder="The title of your message" required>
⭕ Please do not delete the website field, that field is hidden for users and is only used to trap bots and spammers.
<!--Do not delete this part-->
<label id="website" for="website">website:</label>
<input type="text" id="website" name="website" placeholder="www.yoursite.com">
If you want to add a new field to the form, you can easily do this, for example, to add the phone field, add the following code in the HTML part of the form.
<!--I'm just explaining above code and you should not copy this part into your site-->
<label for="Phone">Phone:</label>
<input type="text" id="Phone" name="Phone" placeholder="0930xxxxxx" required>
Step 3. Test your Contact Form
Please go to the contact page of your website and check the form we put together on the site.
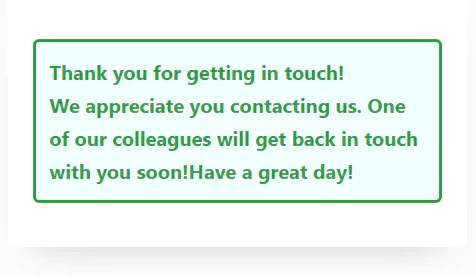
You should get a thank you message after submitting the form.
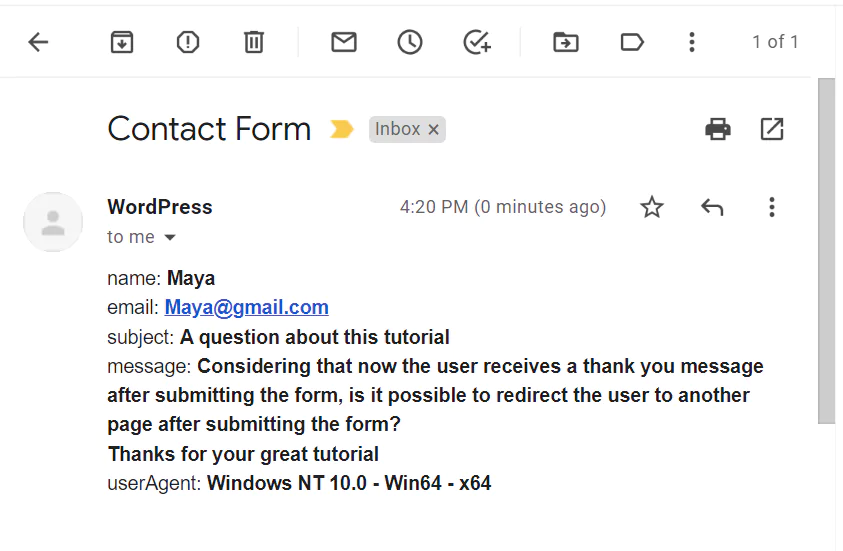
Now check the admin email or the email you entered in the code above to make sure the form has been submitted correctly.
Save All Form Submissions Data in WordPress without plugins
If this article is difficult for you to read in text, you can watch the video version below.
How can I style the contact form to match the design of my WordPress theme?
You can style the contact form by adding custom CSS rules to your theme’s style.css file or by using the ‘style’ attribute within the HTML form elements. To match the design of your WordPress theme, inspect the existing styles applied to other form elements on your website and apply similar styles to your contact form. Be sure to use consistent colors, fonts, and spacing to maintain a cohesive visual appearance.
Can I add more fields to the contact form, such as a dropdown menu or checkboxes?
Yes, you can add more fields to the contact form by modifying the HTML code provided in the article. To add a dropdown menu, use the ‘select’ and ‘option’ tags. For checkboxes, use the ‘input’ tag with the ‘type’ attribute set to ‘checkbox’.
How can I protect my contact form from spam submissions?
In this form, I have used the honeypot technique, in the honeypot technique we add an extra form field that is hidden to human users but visible to bots. If the field is filled out, it indicates that the submission is likely spam.
For more protection, you can implement a few techniques:
– Implement a simple CAPTCHA, such as a basic math problem or a question related to your website’s content that users must answer correctly before submitting the form.
– Add a server-side validation to check the form submission’s timestamp and reject any submissions that occur too quickly, as they are likely automated spam.

Hi, we tried your code on our site.
We noticed a feature missing.
if they want to respond to those who contacted us, what code is missing?
To allow responses to be sent directly to the people who contacted you, you need to set the \”Reply-To\” header with the email they provided in the form. Here\’s an updated version of the code:
$headersmyform = \”From: $frommyformn\”;
$headersmyform .= \”Reply-To: \” . $_POST[\’email\’] . \”n\”;
This way, when you reply to the email, it will go directly to the sender\’s email address.
Thank you i try in the afternoon. 🙂
it\’s possible to save the information of contact in the database with custom function?
i try you code for reply but not work 🙁
Hi, very helpful article, but I\’m looking how to put all this code on a page template and to add and this (https://redpishi.com/wordpress-tutorials/save-form-in-database/) on function.php
Please any help with a new article or send it via email
Thanks
i don\’t understand how anyone thinks this code works. It\’s riddled with deprecations and reference errors.
Thank you so much, it works like charm
Unfortunately, it didn\’t worked for me. After the submission I receive an error \”Sorry, There is a problem in sending your form, please email us your message.\”
Any ideas what causes that?
\”Most likely, \’php mail\’ has been disabled on your server and you need to enable SMTP email on it. You can use the \’WP Mail SMTP\’ plugin for this purpose or follow the tutorial below to do it manually:
https://redpishi.com/wordpress-tutorials/how-to-configure-smtp-email-on-wordpress-without-plugin/
How can i integrate recaptcha over here?
Hey there!
I wanted to let you know that adding Google\’s reCAPTCHA to this particular code isn\’t possible. However, don\’t worry! I\’ve already implemented a honey pot feature in this form, which does a great job of blocking spam—up to 90% effectiveness!
In the future, I might consider creating a tutorial on how to integrate a contact form with Google reCAPTCHA. Stay tuned for that!
Thank you! for the quick answer,
&
Thanks in advance for the new tutorial on how to integrate a contact form with Google reCAPTCHA.