If your website relies on being able to show your audience a vast range of high-quality images, then the simplest option is figuring out how to create a slideshow in WordPress. Not only can you prevent users from having to scroll through images continuously, but you can also create a more beautiful experience.

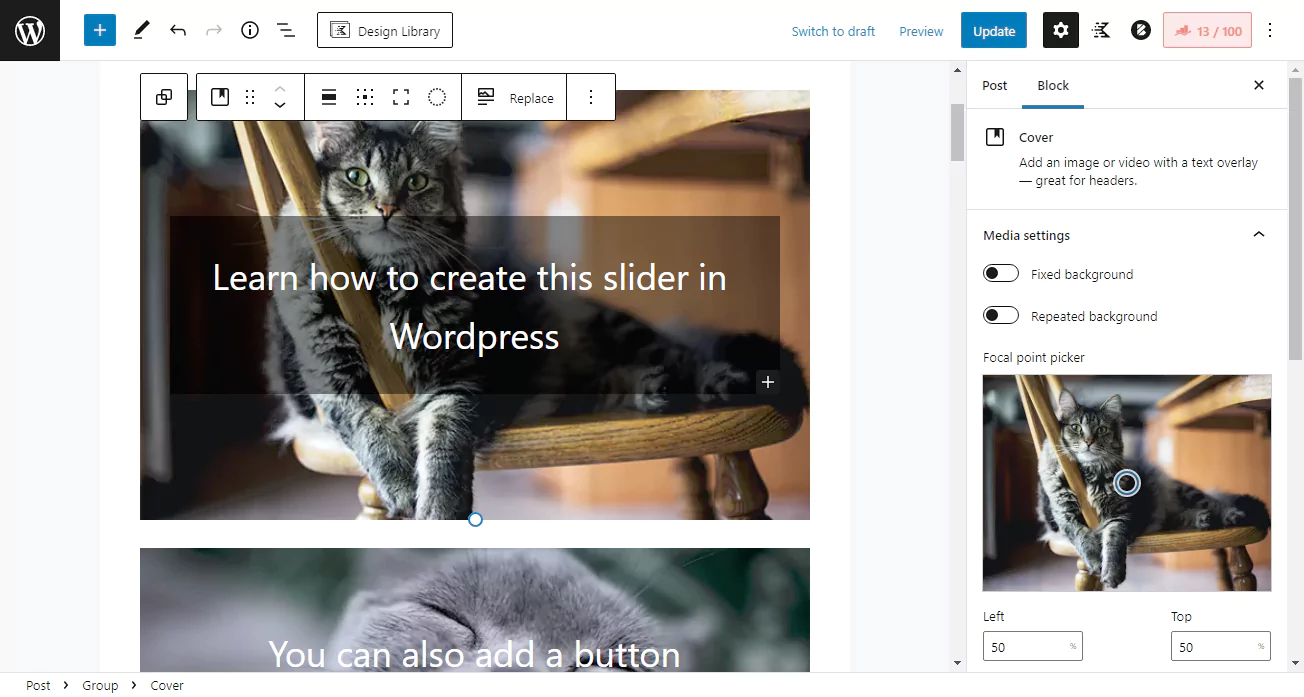
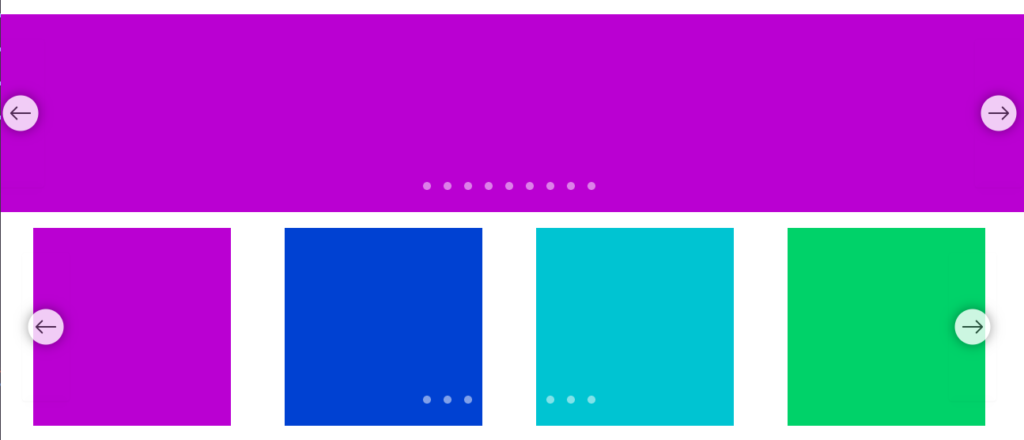
Learn how to create this slider in WordPress

You can also add a button

By default, WordPress does not have a tool to create a slider, in this article we will teach you how to create a slider in WordPress without plugins.
How to make slider in WordPress without plugin
The work steps are as follows: First, we copy the shortcode creation code into the "functions.php" file. After that, you can add a photo slider to the pages by adding some "cover" blocks and adding the slider shortcode.
Step 1.Add The Following Code to the functions.php File
In the WordPress dashboard, go to Appearance ➡ Theme File Editor and copy the following code into the theme’s functions.php file and update it.
You must create a child theme before making any changes to functions.php file. Otherwise, the applied changes will be lost after each update.
Create child theme in WordPress step by step [without plugin]
As an alternative method, you can use the Code Snippets plugin to insert your codes into WordPress.
/*
* slider by redpishi.com
* [slider height="450px" source="slider"]
*/
add_shortcode( 'slider', 'slider_func' );
function slider_func( $atts ) {
    $atts = shortcode_atts( array(
        'height' => '450px',
		'source' => 'slider',
    ), $atts, 'slider' );
static $asearch_first_call = 1;
$source = $atts["source"];
$height = $atts["height"];
$style0 = '<style>
#prev{
    left:0;
    border-radius: 0 10px 10px 0;
}
#next{
    right:0;
    border-radius:10px 0 0 10px;
}
#prev svg,#next svg{
    width:100%;
    fill: #fff;
}
#prev:hover,
#next:hover{
    background-color: rgba(0, 0, 0, 0.8);
}

</style>
';
$js0 = <<<EOD
<script>
const arrowHtml = '<span class="icon-arrow_back" id="prev"></span><span class="icon-arrow_forward" id="next"></span>'
let arrowIconLeft = '<?xml version="1.0" ?><!DOCTYPE svg  PUBLIC \'-//W3C//DTD SVG 1.1//EN\'  \'http://www.w3.org/Graphics/SVG/1.1/DTD/svg11.dtd\'><svg height="50px" id="Layer_1" style="enable-background:new 0 0 50 50;" version="1.1" viewBox="0 0 512 512" width="50px" color="#fff" xml:space="preserve" xmlns="http://www.w3.org/2000/svg" xmlns:xlink="http://www.w3.org/1999/xlink"><polygon points="352,115.4 331.3,96 160,256 331.3,416 352,396.7 201.5,256 "/></svg>';
</script>
EOD;
$style = '<style>
.'.$source.'{
    position: relative;
    overflow: hidden;
	width: 100%!important;
	height: '.$height.';
	padding: 0px!important;
}
.'.$source.' > div {
    width: 100%!important;
    position: absolute;
    transition: all 1s;
	height: '.$height.';
	margin: 0px!important;
 }
.'.$source.' > div {
	height: '.$height.';
 }
.'.$source.' > span{
    height: 50px;
    position: absolute;
    top:50%;
    margin:-25px 0 0 0;
    background-color: rgba(0, 0, 0, 0.4);
    color:#fff;
    line-height: 50px;
    text-align: center;
    cursor: pointer;
}
</style>';
$js = <<<EOD
<script>
document.querySelector('.$source').innerHTML += arrowHtml;
let slides$source = document.querySelectorAll('.$source > div');
let slideSayisi$source = slides$source.length;
let prev$source = document.querySelector('.$source #prev');
let next$source = document.querySelector('.$source #next');
prev$source.innerHTML = arrowIconLeft;
next$source.innerHTML = arrowIconLeft;
next$source.querySelector('svg').style.transform = 'rotate(180deg)';
for (let index = 0; index < slides{$source}.length; index++) {
    const element{$source} = slides{$source}[index];
    element{$source}.style.transform = "translateX("+100*(index)+"%)";
}
let loop{$source} = 0 + 1000*slideSayisi{$source};
function goNext{$source}(){
    loop{$source}++;
            for (let index = 0; index < slides{$source}.length; index++) {
                const element{$source} = slides{$source}[index];
                element{$source}.style.transform = "translateX("+100*(index-loop{$source}%slideSayisi{$source})+"%)";
            }
}
function goPrev{$source}(){
    loop{$source}--;
            for (let index = 0; index < slides{$source}.length; index++) {
                const element{$source} = slides{$source}[index];
                element{$source}.style.transform = "translateX("+100*(index-loop{$source}%slideSayisi{$source})+"%)";
            }
}
next{$source}.addEventListener('click',goNext{$source});
prev{$source}.addEventListener('click',goPrev{$source});
document.addEventListener('keydown',function(e){
    if(e.code === 'ArrowRight'){
        goNext{$source}();
    }else if(e.code === 'ArrowLeft'){
        goPrev{$source}();
    }
});
</script>
EOD;
if ( $asearch_first_call == 1 ){
	 $asearch_first_call++;
	 return "{$style0}{$style}{$js0}{$js}"; } elseif  ( $asearch_first_call > 1 ) {	$asearch_first_call++;
		return "{$style}{$js}"; }}
After updating the "functions.php" file, the [slider] shortcode will be activated for you.
Step 2.Design your slides using Cover Block
Design your slides using cover block. The cover block allows you to use paragraphs, buttons or other Gutenberg blocks on each slide.
The number of slides should be more than one and there is no limit to their number.
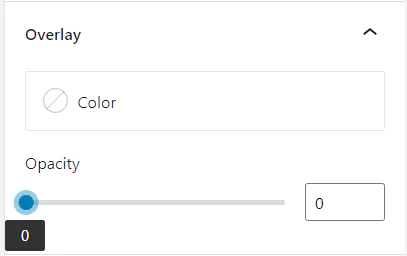
Remember that you can change the opacity of the overlay color on the images with the overlay slider, if you don't need the overlay color, set the slider to zero.
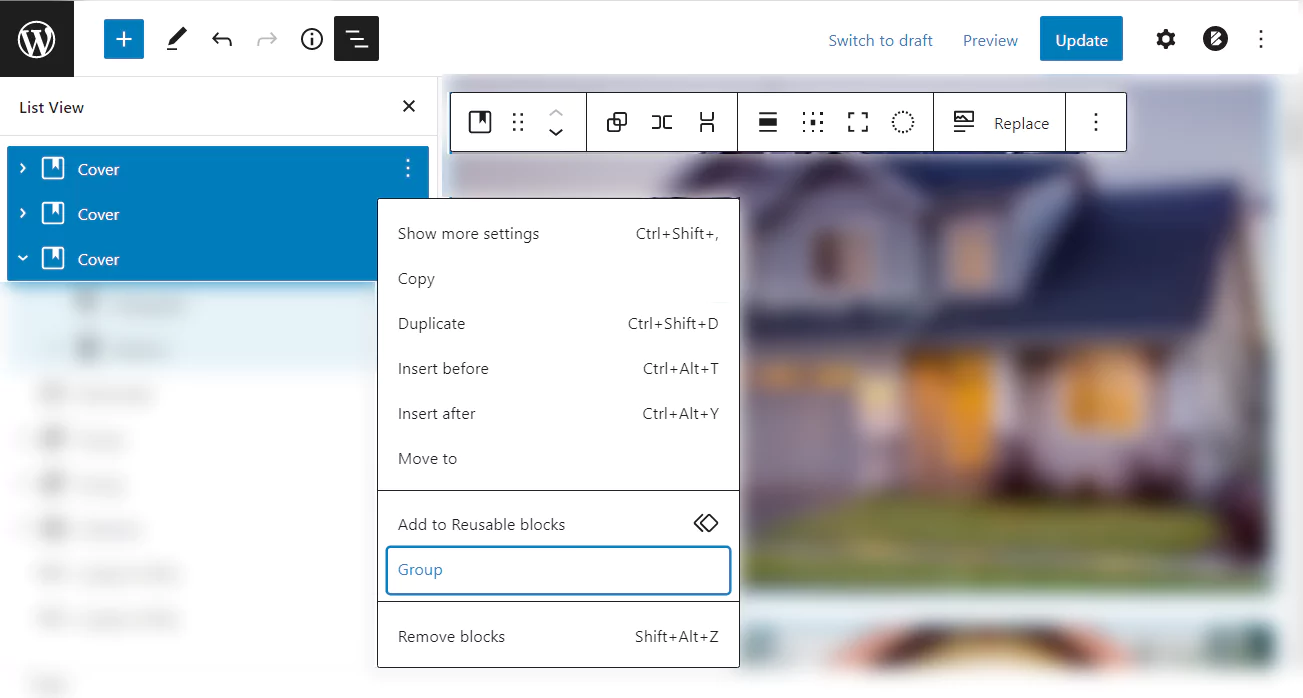
Step 3.Group all cover blocks
Select all the cover blocks and open the design menu by clicking on the three dots button and select the group.
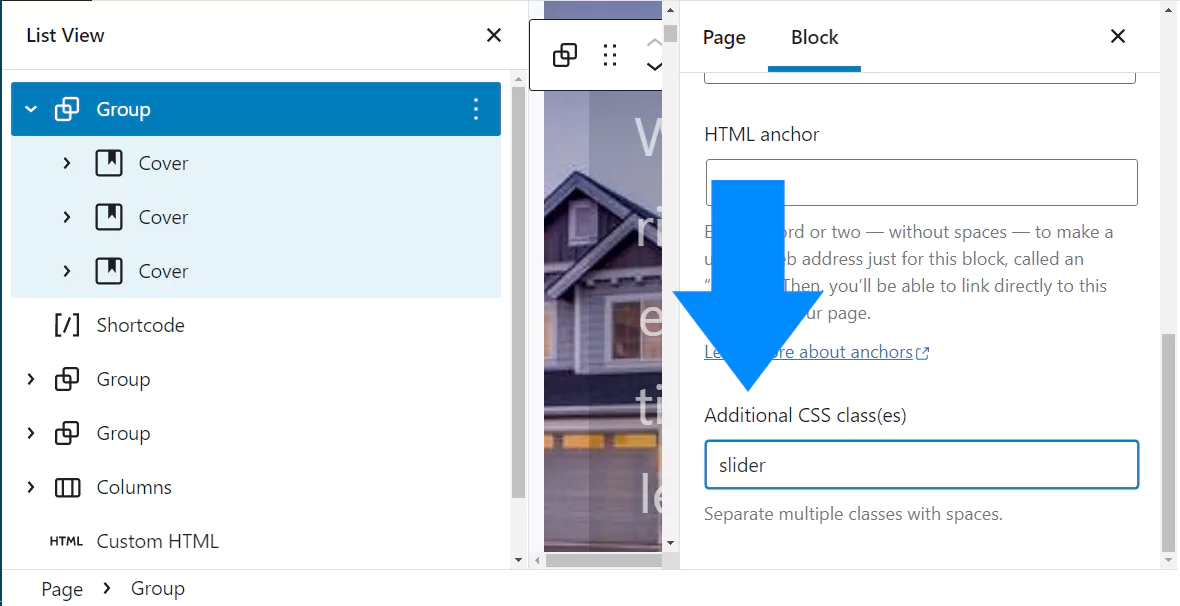
Assign a class to the group you just created. Here we assign the slider class to our group.
Step 4.Add slider Shortcode
Under the group of cover blocks, create a shortcode like the following:
[slider height="450px" source="slider"]This shortcode has two arguments:
source: The name of the class you assigned to the covers group.
height: Slider height.
Image slider with autoplay
Below is the professional version of the above code.
Now you can add more than one slider to the page and also enable autoplay in the sliders. 🔥
By using the "scroll" argument, you can enable autoplay in the sliders. This argument is in seconds. ⏱️
[slider height="450px" source="slider" scroll="4"]You're done, now publish the page and check your slider.
If this article is difficult for you to read in text, you can watch the video version below.
You may also like:
Develop a WordPress Gutenberg Slider Block
The second method:
Convert Gallery block into image slider
In this method, using the code below, we convert the Gallery block into an image slider.
This method is simpler than the previous one and allows you to add multiple slides to each page.
Add The Following Code to the functions.php File
In the WordPress dashboard, go to Appearance ➡ Theme File Editor and copy the following code into the theme’s functions.php file and update it.
/**
* Image slider in WordPress by WPCookie - Convert Gallery block into image slider
* https://redpishi.com/wordpress-tutorials/image-slider-in-wordpress-without-plugins/
*/
add_filter( 'wp_footer', function ( ) {  ?>
<script>
document.querySelectorAll(".wp-slider")?.forEach( slider => {
    var src = [];
    var alt = [];
    var img = slider.querySelectorAll("img");
    img.forEach( e => { src.push(e.src);   if (e.alt) { alt.push(e.alt); } else { alt.push("image"); } })
    let i = 0;
    let image = "";
    let myDot = "";
    src.forEach ( e => { image = image + `<div class="wpcookie-slide" > <img decoding="async" loading="lazy" src="${src[i]}" alt="${alt[i]}" > </div>`; i++ })
    i = 0;
    src.forEach ( e => { myDot = myDot + `<span class="wp-dot"></span>`; i++ })
    let dotDisply = "none";
    if (slider.classList.contains("dot")) dotDisply = "block";
    const main = `<div class="wp-slider">${image}<span class="wpcookie-controls wpcookie-left-arrow"  > <svg xmlns="http://www.w3.org/2000/svg" xml:space="preserve" width="35" height="35" color="#fff" style="enable-background:new 0 0 50 50" viewBox="0 0 512 512"><path d="M352 115.4 331.3 96 160 256l171.3 160 20.7-19.3L201.5 256z"/></svg> </span> <span class="wpcookie-controls wpcookie-right-arrow" > <svg xmlns="http://www.w3.org/2000/svg" xml:space="preserve" width="35" height="35" color="#fff" style="enable-background:new 0 0 50 50" viewBox="0 0 512 512"><path d="M180.7 96 352 256 180.7 416 160 396.7 310.5 256 160 115.4z"/></svg> </span> <div class="dots-con" style="display: ${dotDisply}"> ${myDot}</div></div> `
    slider.insertAdjacentHTML("afterend",main  );
    slider.remove();
})

document.querySelectorAll(".wp-slider")?.forEach( slider => {
var slides = slider.querySelectorAll(".wpcookie-slide");
var dots = slider.querySelectorAll(".wp-dot");
var index = 0;
slider.addEventListener("click", e => {if(e.target.classList.contains("wpcookie-left-arrow")) { prevSlide(-1)} } )
slider.addEventListener("click", e => {if(e.target.classList.contains("wpcookie-right-arrow")) { nextSlide(1)} } )
function prevSlide(n){
  index+=n;
  console.log("prevSlide is called");
  changeSlide();
}
function nextSlide(n){
  index+=n;
  changeSlide();
}
changeSlide();
function changeSlide(){
  if(index>slides.length-1)
    index=0;
  if(index<0)
    index=slides.length-1;
    for(let i=0;i<slides.length;i++){
      slides[i].style.display = "none";
      dots[i].classList.remove("wpcookie-slider-active");
    }
    slides[index].style.display = "block";
    dots[index].classList.add("wpcookie-slider-active");
}
 } )

</script>

<style>
wp-slider * {
padding = 0;
margin = 0;
}
.wp-slider{
  margin:0 auto;
  position:relative;
  overflow:hidden;
}
.wpcookie-slide{
  max-height: 100%;
  width:100%;
  display:none;
  animation-name:fade;
  animation-duration:1s;
}
.wpcookie-slide img{
 width:100%;
}
@keyframes fade{
  from{opacity:0.5;}
  to{opacity:1;}
}
.wpcookie-controls{
  position:absolute;
  top:50%;
  font-size:1.5em;
  padding:15px 10px;
  border-radius:5px;
  background:white;
  cursor: pointer;
  transition: 0.3s all ease;
  opacity: 15%;
  transform: translateY(-50%);
}
.wpcookie-controls:hover{
  opacity: 60%;
}
.wpcookie-left-arrow{
  left:0px;
   border-radius: 0px 5px 5px 0px;
}
.wpcookie-right-arrow{
  right:0px;
 border-radius: 5px 0px 0px 5px;

}
.wp-slider svg {
    pointer-events: none;
}
.dots-con{
  text-align:center;
}
.wp-dot{
  display:inline-block;
  background:#c4c4c4;
  padding:8px;
  border-radius:50%;
  margin:10px 5px;
}
.wpcookie-slider-active{
  background:#818181;
}
@media (max-width:576px){
  .wp-slider{width:100%;
  }
  .wpcookie-controls{
    font-size:1em;
    position: absolute;
    display: flex;
    align-items: center;
  }
  .dots-con{
    display:none;
  }
}
</style>
<?php });
Add a Gallery block
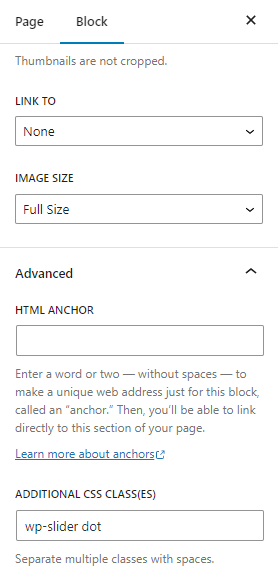
Add a Gallery block to the page and add your images to it. It would be great if they have the same size.
Then we can configure this block by setting IMAGE SIZE to Full Size. Don’t forget to turn off the Crop images option.
Finally, we can assign the "wp-slider" class to this block.
If you want the dots under the slider to be displayed, assign the "wp-slider dot" class to your gallery block.
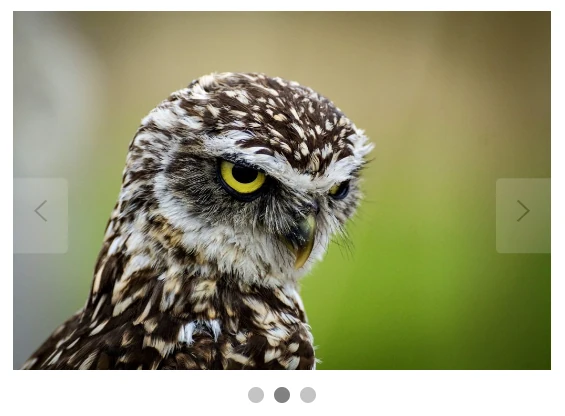
Great! If you check the page now, you’ll see that the gallery block has been converted into a image slider.

Hi Maya, thanks for the code you provide. this is good, but your code is not sliding automatically. and i can get the sliding automatically (from GPT). From first image to the second, third, but now it has problem when reach to the last image it goes back from left to the right quickly to the first slide as in manual, and thats weird. the better is it cicle from last to the first, with consistent sliding direction from right to the left.
Can you give tutorial for this? These code below is what that i can get, the GPT is not understanding what i mean, and keep give me error code for the rest. but this is the last best working one.
/*————————————–
Hi Ari, thank you for your comment and feedback!
Members of WPCookie Plus have access to a more advanced slider code with built-in autoplay.
In the meantime, you can use this simple script to enable autoplay for your current slider. Just add the following code at the end of /script tag in my code:(line 107)
setInterval(() => document.querySelector(\”span#next\”).click(), 4000);
This will automatically trigger the \”Next\” button every 4 seconds (4000ms). Note that this works only if there’s a single slider on the page.
Hi, when I use the Cover method it\’s fine in Desktop, but gives diferrent size of the image in mobile version. How could I put the same version in Desktop and mobile? Thanks!
Could you please help with removing the prev/next arrows when there\’s only 1 image in the slider? It\’s a bad user experience to have an arrow which doesn\’t work.
This slider code is not necessary for one image. You can simply use an image block or a cover block
Yes, you can convert your slider into a reusable block or synchronize patterns (as it is now called) and place it in your widget section.
Is it possible to add a slider to the sidebar so that it is constant for all the posts, like your site does?
Hi, thanks for a nice slider.
Is there any chacnce to scale whole sliding images automatically so they fit in smaller screen without cutting off picture edges? looks like because height has a fixed value , slider do not resize height the image, instead it cut off the edges of image.
many thanks
Tom
Great solution! Thanks a lot!
And can you advise please, how can add caption for every gallery image?
Because default tools of Post editor aren\’t help
hi
thanks for great tuts. we use more than 5 exact code from your tutorial on our website and all of them are perfect. nowadays the snow effect was a great fun for our visitors.
i was going to display 2 slider on page and the second one is not working, i have changed slider to slider-2 for example and no luck. can i ask you to guide how can this be done?
also is there any way to auto scroll images?
thanks for great tuts again.
Hello
For auto scrolling add a custom HTML block after the slider shortcode and paste the following code in it.
<script>
let speed = 4;
document.addEventListener(\”DOMContentLoaded\”, function(){
setTimeout( () =>
setInterval(function () {document.querySelector(\”span.icon-arrow_forward#next\”).click();}, speed * 1000) , 500)
});
</script>
To change the speed of the slide, you can change the speed variable , by default it is set to 4s.
And since I know you are from Iran, I will write the rest in Persian…
برای استفاده از دو اسلایدر در یک صفحه باید کد رو بصورت شی گرا (کلاس اسلایدر) مینوشتم که تبلی کردم و اینکارو نکردم، (برعکس کد کاروسل که شی گراست) بنابراین با این کد بیشتر از یک اسلایدر نمیتونی به صفحه اضافه کنی.