The image block in WordPress opens images in a new tab, which is not ideal. In this tutorial you will learn how to display images in a lightbox instead of a new tab.

How to add lightbox in WordPress without plugin
In this article, we use two methods to create a lightbox. In the first method, we work with a custom code that opens all images inside each post in the lightbox. In the second method, we convert the WordPress image gallery block to a lightbox gallery.
Show WordPress post images in a lightbox
In the WordPress dashboard, go to Appearance ➡ Theme File Editor and copy the following code into the theme’s functions.php file and save it.
You must create a child theme before making any changes to functions.php file. Otherwise, the applied changes will be lost after each update.
Create child theme in WordPress step by step [without plugin]
As an alternative method, you can use the Code Snippets plugin to insert your codes into WordPress.
/*
 * Image Lightbox by WPCookie
 * https://redpishi.com/wordpress-tutorials/lightbox-wordpress/
 * */
add_action( 'wp_footer', function(){ if(!is_admin()) { ?>
<style>
img {
  display: block;
  max-width: 100%;
}
.lightbox {
  position: fixed;
  top: 0;
  left: 0;
  right: 0;
  bottom: 0;
  z-index: 999999;
  background-color: rgba(0, 0, 0, 0.75);
  display: flex;
  justify-content: center;
  align-items: center;
}
.lightbox-content {
  width: 1000px;
  margin: 0 auto;
  display: flex;
  align-items: center;
  justify-content: space-between;
  padding: 0 25px;
  user-select: none;
}
.lightbox-content img {
  max-height: 600px;
  width: 90%;
  object-fit: cover;
  border-radius: 4px;
}
.lightbox-content i {
  color: white;
  font-size: 60px;
  cursor: pointer;
  flex-shrink: 0;
}
i.lightbox-prev, i.lightbox-next {
    padding: 30px 5px;
}
svg.lightbox-prev, svg.lightbox-next {
    pointer-events: none;
}
</style>
<script>
window.addEventListener('load', function () {

[...document.querySelectorAll('main figure a')].forEach(e => {if (e.href.split("/").at(-1).includes('.')) e.replaceWith(...e.childNodes); })
const Allimages = [...document.querySelectorAll('body img')]
const images = Allimages.filter( e => { return e.clientHeight > 150  } )
images.forEach(e => e.style.cursor = "zoom-in")

  array = [...images].forEach(item => item.addEventListener('click', handleCreateLightbox))
  function handleCreateLightbox(e) {
    const linkImage = e.target.getAttribute('src')
    const code = `<div class="lightbox">
  <div class="lightbox-content">
    <i class="lightbox-prev"><svg class="lightbox-prev" width="22"  viewBox="0 0 66.692 126.253" xml:space="preserve" xmlns="http://www.w3.org/2000/svg"><g style="fill:#fff;fill-opacity:1;stroke:none;stroke-opacity:1"><path d="m360.731 229.075-225.1-225.1c-5.3-5.3-13.8-5.3-19.1 0-5.3 5.3-5.3 13.8 0 19.1l215.5 215.5-215.5 215.5c-5.3 5.3-5.3 13.8 0 19.1 2.6 2.6 6.1 4 9.5 4 3.4 0 6.9-1.3 9.5-4l225.1-225.1c5.3-5.2 5.3-13.8.1-19z" style="fill:#fff;fill-opacity:1;stroke:none;stroke-opacity:1" transform="matrix(-.26458 0 0 .26458 96.472 0)"/></g></svg></i>
    <img
      src="${linkImage}"
      alt=""
      class="lightbox-image"
    />
    <i class="lightbox-next"><svg class="lightbox-next" width="22" viewBox="0 0 66.692 126.253" xml:space="preserve" xmlns="http://www.w3.org/2000/svg"><g style="fill:#fff;fill-opacity:1;stroke:none;stroke-opacity:1"><path d="m360.731 229.075-225.1-225.1c-5.3-5.3-13.8-5.3-19.1 0-5.3 5.3-5.3 13.8 0 19.1l215.5 215.5-215.5 215.5c-5.3 5.3-5.3 13.8 0 19.1 2.6 2.6 6.1 4 9.5 4 3.4 0 6.9-1.3 9.5-4l225.1-225.1c5.3-5.2 5.3-13.8.1-19z" style="fill:#fff;fill-opacity:1;stroke:none;stroke-opacity:1" transform="matrix(.26458 0 0 .26458 -29.78 0)"/></g></svg></i>
  </div>
</div>`
    document.body.insertAdjacentHTML('beforeend', code)
  }
  let index = 0
  document.addEventListener('click', handleOutLightbox)
  function handleOutLightbox(e) {
    const lightImage = document.querySelector('.lightbox-image')
    let imageSrc = ''
    if (!lightImage) return

    if (e.target.matches('.lightbox')) {
      const body = e.target.parentNode
      body.removeChild(e.target)

    } else if (e.target.matches('.lightbox-next')) {
      imageSrc = lightImage.getAttribute('src')
      index = [...images].findIndex(item => item.getAttribute('src') === imageSrc)
      index = index + 1
      firstImage = 0
      if (index > images.length - 1) {
        index = firstImage
      }
      ChangeLinkImage(index, lightImage)

    } else if (e.target.matches('.lightbox-prev')) {
      imageSrc = lightImage.getAttribute('src')
      index = [...images].findIndex(item => item.getAttribute('src') === imageSrc)
      index = index - 1
      lastImage = images.length - 1
      if (index < 0) {
        index = lastImage
      }
      ChangeLinkImage(index, lightImage)
    }
  }
  function ChangeLinkImage(index, lightImage) {
    const newLink = [...images][index].getAttribute('src')
    lightImage.setAttribute('src', newLink)
  }
})
</script>

<?php } } );
Done. From now on, all site images will be displayed in the lightbox instead of the new tab.
You may also like:
Develop a WordPress Gutenberg Slider Block
If this article is difficult for you to read in text, you can watch the video version below.
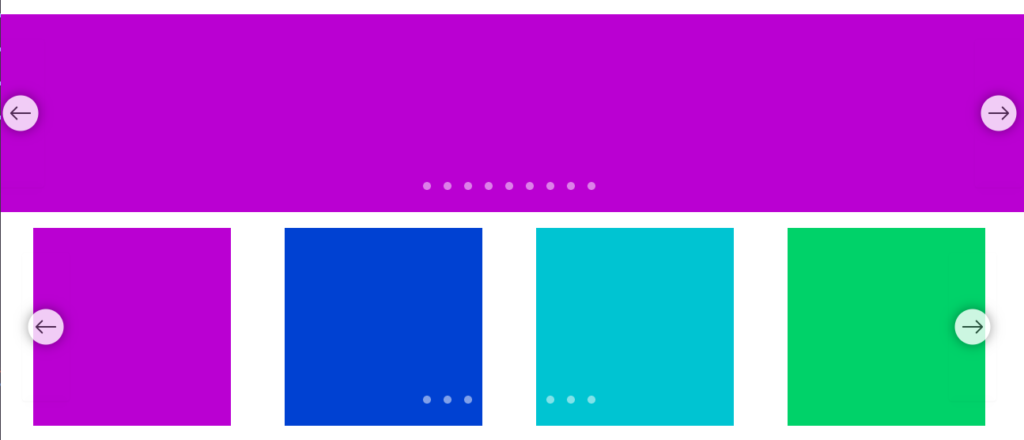
WordPress lightbox gallery without plugin
By using this method, you can modify all image gallery blocks in WordPress so that their images open in a lightbox.
Add a gallery block to your page and add as many images as you like to it.
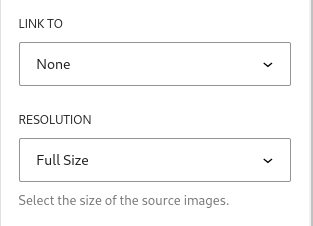
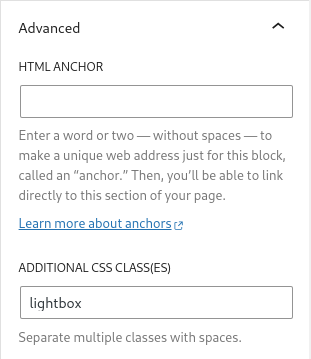
In the block settings, set LINK TO to None and RESOLUTION to Full Size. Finally, assign the lightbox class to this block.
In the WordPress dashboard, go to Appearance ➡ Theme File Editor and copy the following code into the theme’s functions.php file and save it.
You must create a child theme before making any changes to functions.php file. Otherwise, the applied changes will be lost after each update.
Create child theme in WordPress step by step [without plugin]
As an alternative method, you can use the Code Snippets plugin to insert your codes into WordPress.
/*
 * WordPress lightbox gallery without plugin by WPCookie
 * https://redpishi.com/wordpress-tutorials/lightbox-wordpress/
 * */
add_action( 'wp_footer', function(){ if(!is_admin()) { ?>
<style>
img {
  display: block;
  max-width: 100%;
}
.cookie_box {
  position: fixed;
  top: 0;
  left: 0;
  right: 0;
  bottom: 0;
  z-index: 999999;
  background-color: rgba(0, 0, 0, 0.75);
  display: flex;
  justify-content: center;
  align-items: center;
}
.cookie_box-content {
    width: 1000px;
    margin: 0 25px;
    display: flex;
    align-items: center;
    justify-content: space-between;
    user-select: none;
}
.cookie_box-content img {
  max-height: 600px;
  width: 90%;
  object-fit: cover;
  border-radius: 4px;
}
.cookie_box-content i {
  color: white;
  font-size: 60px;
  cursor: pointer;
  flex-shrink: 0;
}
i.cookie_box-prev, i.cookie_box-next {
    padding: 30px 5px;
}
svg.cookie_box-prev, svg.cookie_box-next {
    pointer-events: none;
}
</style>
<script>
window.addEventListener('load', function () {
const allGallery = [...document.querySelectorAll('.lightbox')]

let imageGroup = [];
let images = [];
allGallery.forEach((item, index) => {
   let imgs =  item.querySelectorAll('img')
    const imageArray = [];
   imgs.forEach((im) => {
        im.setAttribute('data-galley', index);
        imageArray.push(im);
        images.push(im);
})

imageGroup.push(imageArray);


});

images.forEach(e => e.style.cursor = "zoom-in")

  array = [...images].forEach(item => item.addEventListener('click', handleCreateLightbox))
  function handleCreateLightbox(e) {
    let linkImage = e.target.getAttribute('src')
    let ss = e.target.dataset.galley
    let code = `<div class="cookie_box">
  <div class="cookie_box-content">
    <i class="cookie_box-prev" data-source="${ss}"><svg class="cookie_box-prev" data-source="${ss}" width="22"  viewBox="0 0 66.692 126.253" xml:space="preserve" xmlns="http://www.w3.org/2000/svg"><g style="fill:#fff;fill-opacity:1;stroke:none;stroke-opacity:1"><path d="m360.731 229.075-225.1-225.1c-5.3-5.3-13.8-5.3-19.1 0-5.3 5.3-5.3 13.8 0 19.1l215.5 215.5-215.5 215.5c-5.3 5.3-5.3 13.8 0 19.1 2.6 2.6 6.1 4 9.5 4 3.4 0 6.9-1.3 9.5-4l225.1-225.1c5.3-5.2 5.3-13.8.1-19z" style="fill:#fff;fill-opacity:1;stroke:none;stroke-opacity:1" transform="matrix(-.26458 0 0 .26458 96.472 0)"/></g></svg></i>
    <img
      src="${linkImage}"
      alt=""
      class="cookie_box-image"
    />
    <i class="cookie_box-next" data-source="${ss}"><svg data-source="${ss}" class="cookie_box-next" width="22" viewBox="0 0 66.692 126.253" xml:space="preserve" xmlns="http://www.w3.org/2000/svg"><g style="fill:#fff;fill-opacity:1;stroke:none;stroke-opacity:1"><path d="m360.731 229.075-225.1-225.1c-5.3-5.3-13.8-5.3-19.1 0-5.3 5.3-5.3 13.8 0 19.1l215.5 215.5-215.5 215.5c-5.3 5.3-5.3 13.8 0 19.1 2.6 2.6 6.1 4 9.5 4 3.4 0 6.9-1.3 9.5-4l225.1-225.1c5.3-5.2 5.3-13.8.1-19z" style="fill:#fff;fill-opacity:1;stroke:none;stroke-opacity:1" transform="matrix(.26458 0 0 .26458 -29.78 0)"/></g></svg></i>
  </div>
</div>`
    document.body.insertAdjacentHTML('beforeend', code)
  }
  let index = 0
  document.addEventListener('click', handleOutLightbox)
  function handleOutLightbox(e) {
    const lightImage = document.querySelector('.cookie_box-image')
    let imageSrc = ''
    if (!lightImage) return
    let galley_id = e.target.dataset.source;

    if (e.target.matches('.cookie_box')) {
      const body = e.target.parentNode
      body.removeChild(e.target)

    } else if (e.target.matches('.cookie_box-next')) {
      imageSrc = lightImage.getAttribute('src')

      index = imageGroup[galley_id].findIndex(item => item.getAttribute('src') === imageSrc)
      index = index + 1
      firstImage = 0
      if (index > imageGroup[galley_id].length - 1) {
        index = firstImage
      }
      ChangeLinkImage(galley_id , index, lightImage)

    } else if (e.target.matches('.cookie_box-prev')) {
      imageSrc = lightImage.getAttribute('src')
      index = imageGroup[galley_id].findIndex(item => item.getAttribute('src') === imageSrc)
      index = index - 1
      lastImage =imageGroup[galley_id].length - 1
      if (index < 0) {
        index = lastImage
      }
      ChangeLinkImage( galley_id, index, lightImage)
    }
  }
  function ChangeLinkImage(galley_id, index, lightImage) {
    const newLink = imageGroup[galley_id][index].getAttribute('src')
    lightImage.setAttribute('src', newLink)
  }


})
</script>

<?php } } );
Alright, we’re done. From now on, all gallery blocks that have the lightbox class will open in a lightbox.
If this article is difficult for you to read in text, you can watch the video version below.

Hi Maya,
I am interested in learning how to make Website on WordPress. Do you also teach?
I would make this as a part time job
Sanjay K
Is it possible to make the Video block to play in a lightbox?
Fantastic script. I prefer solutions that do not require a plugin. I made some changes so that it only works on the DIVI slide module and it was easy to do that. The only thing I could not find is to add a function to close the lightbox when the ESC key is pressed. At the moment the only way to close it is clicking outside the image. And as we all know people are not really that clever. And most people seem to know that the ESC key will close.
Hi Ralf, Here\’s how you can modify the script to add a function to close the lightbox when the ESC key is pressed. :
1. First, you need to add an event listener for the `keydown` event on the `document` object.
document.addEventListener(\’keydown\’, handleKeyDown);
2. Then, create the `handleKeyDown` function that will check if the pressed key is the `Escape` key (`key === \’Escape\’`). If it is, find the `.lightbox` element and remove it from the DOM.
function handleKeyDown(e) {
if (e.key === \’Escape\’) {
const lightbox = document.querySelector(\’.lightbox\’);
if (lightbox) {
lightbox.parentNode.removeChild(lightbox);
}
}
}
3. Don\’t forget to remove the `handleKeyDown` event listener when the lightbox is closed to prevent memory leaks.
function handleOutLightbox(e) {
// … existing code …
if (e.target.matches(\’.lightbox\’)) {
const body = e.target.parentNode;
body.removeChild(e.target);
// Remove the \’keydown\’ event listener
document.removeEventListener(\’keydown\’, handleKeyDown);
}
// … existing code …
}
Here\’s the updated script with the escape key functionality:
window.addEventListener(\’load\’, function () {
// … existing code …
document.addEventListener(\’click\’, handleOutLightbox);
document.addEventListener(\’keydown\’, handleKeyDown);
function handleKeyDown(e) {
if (e.key === \’Escape\’) {
const lightbox = document.querySelector(\’.lightbox\’);
if (lightbox) {
lightbox.parentNode.removeChild(lightbox);
// Remove the \’keydown\’ event listener
document.removeEventListener(\’keydown\’, handleKeyDown);
}
}
}
function handleOutLightbox(e) {
// … existing code …
if (e.target.matches(\’.lightbox\’)) {
const body = e.target.parentNode;
body.removeChild(e.target);
// Remove the \’keydown\’ event listener
document.removeEventListener(\’keydown\’, handleKeyDown);
}
// … existing code …
}
// … existing code …
});
With this modification, users can now close the lightbox by either clicking outside the image or pressing the `Escape` key.
Amazing work. However, there\’s a major issue.
I want to display the \”thumbnails\” on the post but when I do that, it opens the \”thumbnails\” which is blurry and not the \”full size\”.
Is there a possibility to show the \”thumbnails\” on the post but it opens to \”full size\” when clicked?
You made a good point, Nikita. For this code to work, you need to set the image quality to full size, otherwise the images will appear blurry in the lightbox. I suggest you use webp images, which are smaller in size.
Hello,
is it possible to add the lightbox to two different clases, like .gallery1 and .gallery2 ??
The idea is to display to galleries on the same page, but on the lightbox just to see the one of every gallery….
Thankssss
Angel
Hi Angel,
I hope you\’re doing well.
I have updated the post. Now, you can add multiple galleries with lightboxes to your pages using the second method described in the post.
Thanks for the perfect code! 👌
Is there a way to just apply it for Posts (Blog posts) and exclude all other pages?
To make the lightbox appear only in the posts, locate the following line:
add_action( \’wp_footer\’, function(){ if(!is_admin()) { ?>
and replace it with:
add_action( \’wp_footer\’, function(){ if(is_singular(\’post\’)) { ?>
Hi. I\’m trying to adapt this neat script for WP galleries. It works fine for single images, but for galleries, the light box loads but then the click follows through and loads a page containing the image https://mysite.site/wp-content/uploads/2023/10/FLOWER-Std.jpg
I thought mabe I needed to kill the onclick
$(\”.gallery-item .gallery-icon a img\”).each( function() {
this._onclick = this.onclick;
this.onclick = null;
});
but that wasn\’t it. Any ideas?
Hey there, Ivan!
Assign a class to the WP galleries block, something like \”mygallery\”. Then, in the script, we\’ll just need to tweak the CSS selector a bit: (Line 55)
const Allimages = […document.querySelectorAll(\’.mygallery img\’)];
With this simple change, the script will display only the images that belong to blocks with the \”mygallery\” class. It\’s a small adjustment that will make a big difference! Let me know if you have any questions or need further assistance.
The problem was that the gallery had link=\”file\” in the shortcode. Changing to none fixed the issue. Thanks!
The code is perfect. And I wanna it only to apply to the product page\’s review section. How can I change the condition here.
I only know
add_action( \’wp_footer\’, function(){ if(is_product()) { ?>
But how to check if it is the \”review\” section in the product page?
Thank you!!!
Hey Pearson!
Check out the line below, Here I select the images to display in the lightbox:
const Allimages = […document.querySelectorAll(\’body img\’)]
If you want to select images from the review section, just make a small modification. Assuming your reviews are contained within a div with the class \’review\’, you can update the image selector to \’.review img\’.
const Allimages = […document.querySelectorAll(\’.review img\’)]
Thanks for this code. It works perfectly on my site. Is it possible to exclude any front page images from opening up in the lightbox? On my blog, the front page has photos linking to the post. Thank you in advance.
Hey there. If you don\’t want the lightbox to appear on the first page of your site, you can change the first line of the code. Simply replace this line:
add_action( \’wp_footer\’, function(){ if(!is_admin()) { ?>
with this line:
add_action( \’wp_footer\’, function(){ if(!is_front_page() || !is_home()) { ?>
I hope that helps! Let me know if you have any other questions.