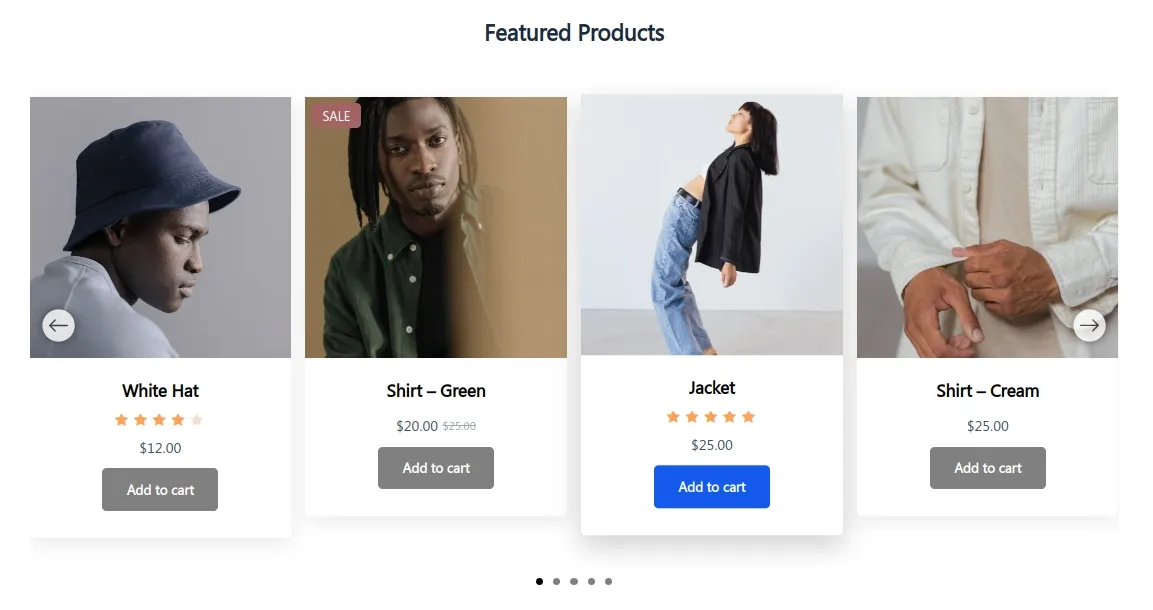
In this tutorial you will learn how to add a post or product Carousel to your WordPress. The carousel will automatically update itself when you add new posts or new products to your WordPress.
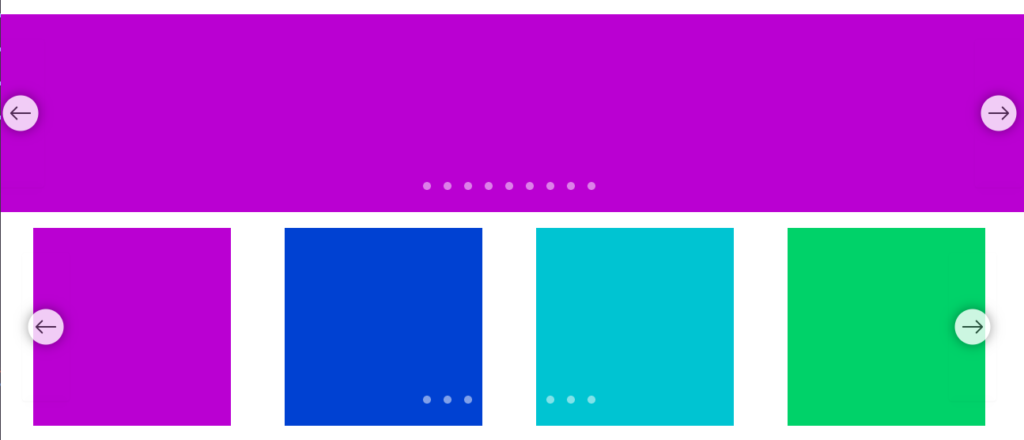
At the end of this tutorial, we will create a WordPress post carousel as follows:
-
How To Redirect Pages In WordPress Without A Plugin
-

Limit login attempts in WordPress without plugin
-
![How to create Custom login page in WordPress without plugin [fast and easy]](https://redpishi.com/wp-content/uploads/2022/06/Custom-login-page-WordPress-without-plugin.webp)
How to create Custom login page in WordPress without plugin [fast and easy]
-
![How to change wp-admin URL [Without Plugins]](https://redpishi.com/wp-content/uploads/2022/06/How-to-change-wp-admin-url-Without-Plugin.webp)
How to change wp-admin URL [Without Plugins]
-
![How to add preloader in WordPress [without plugins]](https://redpishi.com/wp-content/uploads/2022/06/preloader-in-wordpress-without-plugin.webp)
How to add preloader in WordPress [without plugins]
-
![How to add PHP code in WordPress [without plugins]](https://redpishi.com/wp-content/uploads/2022/06/how-to-add-php-code-in-wordpress.webp)
How to add PHP code in WordPress [without plugins]
-
Add Contact Form in WordPress without plugins
-
![How to add meta description in WordPress [without plugins]](https://redpishi.com/wp-content/uploads/2022/07/add-meta-description-in-wordpress-without-plugin.webp)
How to add meta description in WordPress [without plugins]
How to add carousel in WordPress without plugin
There are 3 steps in this tutorial:
- Add snippet of Code to the functions.php File
- Design your slides using Gutenberg Blocks
- Add Carousel Shortcode
You may also like:
CREATE WOOCOMMERCE PRODUCT CAROUSEL SLIDER WITHOUT PLUGINS
Step 1.Add The Following Code to the functions.php File
Inside the WordPress dashboard Theme Editor or on the web server, find and open the functions.php file. Go to Appearance -> Theme Editor.
You must create a child theme before making any changes to functions.php file. Otherwise, the applied changes will be lost after each update.
Create child theme in WordPress step by step [without plugin]
As an alternative method, you can use the Code Snippets plugin to insert your codes into WordPress.
/*
* carousel by redpishi.com
* [carousel source='class-name' num='4']
*/
add_shortcode( 'carousel', 'carousel_func' );
function carousel_func( $atts ) {
    $atts = shortcode_atts( array(
        'num' => '4',
		'source' => 'carousel',
    ), $atts, 'carousel' );
static $carousel_first_call = 1;
$source = $atts["source"];
switch ($atts["num"]) {
  case "1":
    $num = "4000";
    break;
  case "2":
    $num = "450";
    break;
  case "3":
    $num = "450, 768";
    break;
  case "4":
    $num = "350, 768, 992";
    break;
  case "5":
    $num = "350, 768, 992, 1100";
    break;
  case "6":
    $num = "350, 576, 768, 992, 1100";
    break;
  case "7":
    $num = "350, 576, 768, 992, 1100, 1250";
    break;
  case "8":
    $num = "250,350, 576, 768, 992, 1100, 1250";
    break;
  case "9":
    $num = "350, 450, 550, 576, 768, 992, 1100, 1250";
    break;
  case "10":
    $num = "200, 350, 450, 550, 576, 768, 992, 1100, 1250";
    break;
  default:
    $num = "576, 768, 992";
}
$const = '<style>
#prev, #next{
    padding: 0px;
    height: 35px;
    position: absolute;
    top:50%;
    margin:-25px 0 0 0;
    background-color: rgba(0, 0, 0, 0.4);
    color:#fff;
    line-height: 40px;
    text-align: center;
    cursor: pointer;
}
#prev {
    left: 0;
    border-radius: 50%;
}
#next {
    right: 0;
    border-radius: 50%;
}
#prev svg,#next svg{
    width:100%;
    fill: #fff;
}
#prev:hover,
#next:hover{
    background-color: rgba(0, 0, 0, 0.8);
}
.carousel {
    margin: auto;
    overflow: hidden;
    padding: 0 10px;
    position: relative;
    background-color: #ffffff;
}
.carousel ul {
    list-style-type: none;
    margin: 0;
    overflow: hidden;
    transition: 0.7s;
    display: flex!important;
    flex-direction: row;
    flex-wrap: nowrap;
    padding: 0px 0px 33px 0px;
    align-items: stretch;
    align-content: stretch;
    max-width: unset!important;
}
.carousel ul li {
    background-color: white;
    margin: 0 16px -4px 0;
    min-height: 150px;
    height: max-content;
    flex: unset!important;
    padding: 7px 0px!important;
    box-shadow: 0px 16px 32px -16px #dedede;
}
.carousel ul li img {
  width: 100%;
}
</style>';
$const2 = <<< JS
<script>
  class Slider {
    constructor(id, mediaQueries) {
      this.arrowHtml = '<span class="slider-arrow-prev" id="prev"></span><span class="slider-arrow-next" id="next"></span>'
      this.leftArrow = '<?xml version="1.0" ?><!DOCTYPE svg  PUBLIC \'-//W3C//DTD SVG 1.1//EN\'  \'http://www.w3.org/Graphics/SVG/1.1/DTD/svg11.dtd\'><svg height="35px" id="Layer_1" style="enable-background:new 0 0 50 50;" version="1.1" viewBox="0 0 512 512" width="35px" color="#fff" xml:space="preserve" xmlns="http://www.w3.org/2000/svg" xmlns:xlink="http://www.w3.org/1999/xlink"><polygon points="352,115.4 331.3,96 160,256 331.3,416 352,396.7 201.5,256 "/></svg>';
	  if (document.querySelector('.'+id).classList.contains("wc-block-all-products")) {
	   this.slider = document.querySelector('div.'+id+':nth-child(2)');
	  } else {
	  this.slider = document.querySelector('.'+id); }
      this.slider.innerHTML += this.arrowHtml;
      this.sliderList = this.slider.querySelector("ul");
	  this.sliderList.removeAttribute("class");
      this.sliderItems = this.slider.querySelectorAll("ul li");
      this.sliderNext = this.slider.querySelector(".slider-arrow-next");
      this.sliderPrev = this.slider.querySelector(".slider-arrow-prev");
      this.sliderPrev.innerHTML = this.leftArrow;
      this.sliderNext.innerHTML = this.leftArrow;
      this.sliderNext.querySelector('svg').style.transform = 'rotate(180deg)';
      this.mediaQueryList = [
        window.matchMedia('screen and (max-width:'+ mediaQueries[0] - 1+'px)')
      ];
      mediaQueries.forEach((mediaQuery) => {
        this.mediaQueryList.push(
          window.matchMedia('screen and (min-width:'+mediaQuery+'px)')
        ); });
      this.numberOfVisibleItems = null;
      this.currentItemIndex = null;
      this.sliderItemsLength = this.sliderItems.length;
      this.mediaQueryLength = this.mediaQueryList.length;
      this.mediaQueryList.forEach((mediaQuery) => {
        mediaQuery.addEventListener("change", () => {
          this.run();
        });
      });
      this.sliderNext.addEventListener("click", () => {
        if (
          this.currentItemIndex <
          this.sliderItemsLength - this.numberOfVisibleItems
        ) {
          this.currentItemIndex++;
          this.shiftSlides();
        } else {
          this.currentItemIndex = null
          this.shiftSlides();
        }
      });
      this.sliderPrev.addEventListener("click", () => {
        if (this.currentItemIndex > 0) {
          this.currentItemIndex--;
          this.shiftSlides();
        }else {
          this.currentItemIndex = this.sliderItemsLength - this.numberOfVisibleItems
          this.shiftSlides();
        }
      });
    }
    run() {
      let index = this.mediaQueryLength - 1;
      while (index >= 0) {
        if (this.mediaQueryList[index].matches) {
          this.numberOfVisibleItems = index + 1;
          this.currentItemIndex = 0;
          this.sliderList.style.transform = "translateX(0)";
			this.sliderList.style.width = 'calc(' +
            (100 / this.numberOfVisibleItems) * this.sliderItemsLength
          +'% + ' + (this.sliderItemsLength / this.numberOfVisibleItems) * 16 +'px)';
          this.sliderItems.forEach((item) => {
            item.style.width = 100 / this.numberOfVisibleItems + '%';
          });
          break;
        }
	index--; }}
    shiftSlides() {
      this.sliderList.style.transform = 'translateX('+
        (100 / this.sliderItemsLength) * -1 * this.currentItemIndex
  +'%'; }}
</script>
JS;
$carousel = '
<script>
document.addEventListener("DOMContentLoaded", (event) => {
  new Slider("'.$source.'", [ '.$num.']).run();
})
</script> ';
if ( $carousel_first_call == 1 ){
	 $carousel_first_call++;
	 return "{$const}{$const2}{$carousel}"; } elseif  ( $carousel_first_call > 1 ) {	$carousel_first_call++;
		return "{$carousel}"; }}
After updating the “functions.php” file, the [carousel] shortcode will be registered.
Step 2.Design your slides using Query Loop or Woocommerce blocks
You can use any of the following blocks to make a carousel:
Step 2.1.Design slides using Query Loop
Adjust the settings according to your preference. The important settings you need to make are as follows:
Select Grid view
Items Per Page: 10 or more
Max page to show: 1

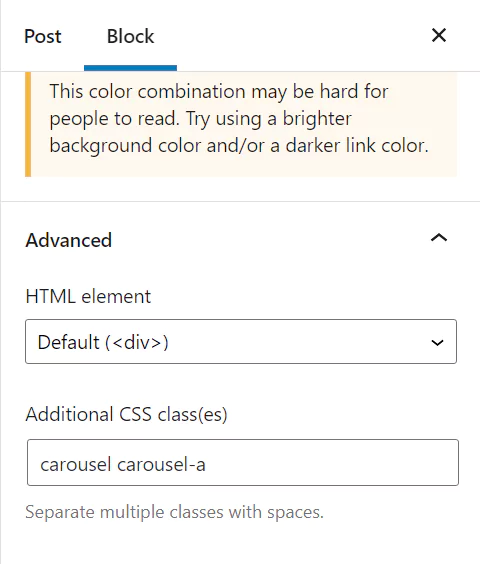
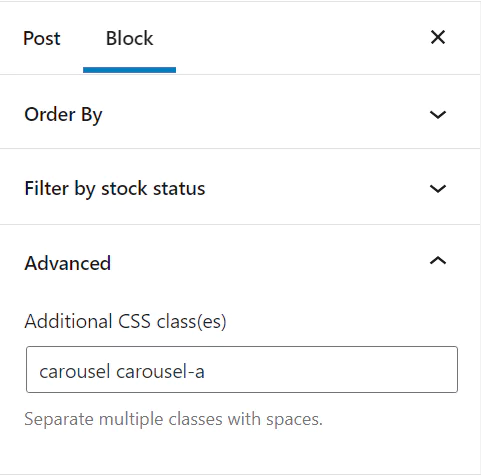
After that, Assign these two classes to the Query Loop block.
carousel carousel-a
Step 2.2.Design slides using Woocommerce blocks
You can use any Woocommerce block to design your product carousel, here we use Products by Category Block.
Adjust the block settings according to your preference. The important settings you need to make are as follows:
Columns: 2 or 3
Rows: 5 or 6 (We need at least 10 products to make the carousel.)
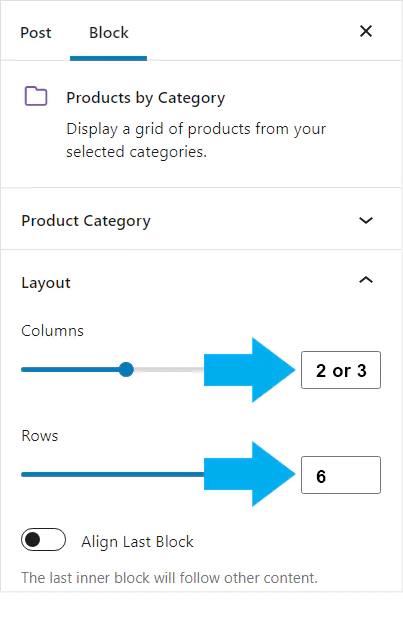
After that, Assign these two classes to the Woocommerce block.
carousel carousel-a
Step 3.Add carousel Shortcode
Add a shortcode block like the following:
[carousel source='carousel-a' num='4']This shortcode has two arguments:
source: The name of the class you assigned to the WordPress block in step2.
num: Number of slides per page. For example, In the carousel at the top of the page, this argument is 3.
You may also like:
Develop a WordPress Gutenberg Slider Block
Carousel with autoplay
The following code is used to create a professional carousel with autoplay. Paste it in your theme’s functions file or in a code snippet plugin.
You can add the carousel to your pages using the following shortcode.
[carousel source='class-name' num='4' scroll='4']In the above shortcode, you can enable autoplay in the carousel by using the argument “scroll”. The argument “scroll” specifies the duration in seconds to move to the next slide. If you set it to zero, the autoplay will be disabled.
You’re done, now publish the page and check your carousel.
If this article is difficult for you to read in text, you can watch the video version below.
That’s it, If you have a question, be sure to comment for us to answer.

When I set num = \’1\’ for some reason it shows all the posts. Is there something I am missing to just show 1 slide?
Thank you.
Thank you SO much for this guide!! It works perfectly and it doesn\’t require any plugins. In fact, it worked way better than all the different plugins I tried.